If there’s one thing every local It Girl knows, it’s this: a great nail set is never just an accessory—it’s the outfit. And this year, pearl nails are taking over everything from Pinterest boards to TikTok GRWMs. Whether you’re dressing up for brunch, planning a soft glam moment, or just in your “clean girl era,” pearl nail polish is the ultimate go-to. From pearl white nails to pink pearl shimmer, and even pearl chrome nails that reflect like your favorite lip gloss, this roundup has it all. Scroll for 50 pearl nail designs that look like they came straight from your fave salon’s Instagram—plus inspo, pro tips, and where to shop the exact look. Why Pearl Nails Are the Moment Pearl nails are feminine, fresh, and timeless—but they’re also unexpectedly versatile. You can go classic with pearl white or edgy with pearl chrome. You can layer them over French tips, swirl them into your nail art, or even press real mini pearls into your design. Besides, pearl nail polish is flattering on every skin tone, and the pearlescent finish plays so well with sunlight, flash photography, and soft-glam makeup looks. Basically: pearl nail designs = instant main character energy. The 30 Best Pearl Nail Designs to Try This Year Here’s the full list broken down by category—so whether you’re going for minimal, bold, bridal, or just really love pink, there’s something for you. 1. Glossy Pearl White Almond Nails If you’re after that effortlessly glam look, glossy pearl white coffin nails are a no-brainer. The coffin shape elongates your fingers while the high-shine pearl finish adds a soft radiance that catches the light at every angle. This design works beautifully on any skin tone and pairs just as well with denim and a tee as it does with your fanciest dinner outfit. A must-try if you’re new to pearl nails but want to make a statement without going overboard. 2. Short Square Pearl Nails Short square nails are back—and when you layer them with a pearlescent polish, they become the quiet luxury version of pearl nail designs. The clean edges keep it practical for everyday wear (hello, laptop girlies), while the shimmer adds just enough femininity. This look is perfect if you’re into clean girl style or simply prefer understated elegance. Pair with nude lipstick and your go-to claw clip for the full effect. 3. Iridescent French Tips Take your basic French manicure and upgrade it with a sheer pearl white tip that glows like your favorite highlighter. These iridescent French tips give old money meets modern princess energy. The contrast between the natural base and glowing tip makes your nails look longer and more refined—aka perfect for weddings, interviews, or when you’re just trying to feel like that girl. Use a sheer pearl nail polish to get the effect at home. 4. Matte Pearl with Glossy Tips Want something unique but still classy? Matte pearl white nails with glossy tips are subtle but sophisticated. The matte base gives a soft velvet texture, while the glossy pearl nails chrome tips add that extra edge without overpowering. This is a great way to experiment with texture if you’re into minimalist pearl nail art designs but still want to keep things soft and wearable. 5. Pearl White Almond Nails Almond nails are universally flattering—and when coated in pearl white nail polish, they instantly become wedding-worthy. These are ideal for brides, bridesmaids, or literally anyone attending a special event. The elongated shape adds elegance, while the pearlescent finish creates a delicate shimmer that photographs beautifully. This is your “say yes to the nails” moment. 6. White Pearl Ombré Fade This design blends a milky white base with a sheer pearl finish that fades toward the tip, creating a dreamy, cloud-like look. Ombré pearl white nails are perfect if you love softness, subtle transitions, and barely-there beauty. It gives the illusion of length and brightness while keeping your nails light, airy, and versatile for any outfit or season. 7. Minimalist Pearl Dot on Clear Base Clear nails with a single centered pearl dot are the nail version of a dainty necklace—barely-there but unforgettable. This is peak minimalist nail art and so easy to DIY. It’s a modern twist on nails art designs with pearls, giving off gallery-girl energy while still being super wearable. Use a dotting tool or a mini flatback pearl to recreate the look at home. 8. White Chrome Pearlescent Sheen If you want your nails to reflect like lip gloss, white pearl chrome nails are the move. With an opalescent mirror-like finish, this design feels futuristic, feminine, and a little bit Barbie-coded (in the best way). The sheen shifts with the light and brings that rich girl on vacation aesthetic straight to your hands. Perfect for birthday nails, girls’ night, or a glam moment at brunch. 9. Swirled White Pearl Polish Think cloud-like movement and soft, swirling shimmer. Swirled pearl white polish creates a marbled nail design that’s perfect if you want something a bit artsy and luxe. Each nail is slightly different, making the design look hand-crafted and high-end. This is one of those pearl nail designs that screams “I paid for custom art,” whether you DIY or head to your local salon. 10. 3D Pearls on Milky White Base This design layers flatback pearls on top of a milky, semi-sheer white base for a classy, textured finish. It’s one of the most iconic nails art designs with pearls—popular for bridal looks, engagement shoots, or anytime you want a little extra. Just make sure to seal the pearls with a top coat or builder gel so they stay put. It’s giving timeless luxury with a tactile twist. 11. Bubblegum Pearl Sheen This look is giving cotton candy vibes in nail form. A juicy bubblegum pink base topped with a pearl sheen creates a flirty finish that feels straight out of a Y2K dream. These pink pearl nails are perfect for spring picnics, flirty dates, or whenever you’re feeling extra

My Clean Girl Skin Care Routine: Products I Swear By
Clean girl skin care is at the heart of the clean girl aesthetic — because skin is everything. That fresh, glowy, “I woke up like this” vibe starts with a simple, effective skincare routine, and the best part is you don’t need a million products to get there. It’s all about taking care of your skin so it looks radiant, healthy, and naturally beautiful without layers of makeup. I’ve kept my routine straightforward and budget-friendly while still getting that clean, hydrated glow. If you want skin that always looks polished and put together, here’s the exact routine I follow — and trust me, it works. 1. Cleanse – Wash Away Dirt, Oil, and Makeup The foundation of any good skincare routine is a gentle, effective cleanser. Your skin collects dirt, oil, and pollutants throughout the day — not to mention makeup — so cleansing is non-negotiable. A good cleanser removes impurities without stripping your skin of its natural oils, leaving it balanced and refreshed. My favorite? I keep it super simple with Dove Beauty Bar (Unscented). It’s gentle, affordable, and leaves my skin feeling soft without irritation. If you prefer a liquid cleanser, CeraVe Hydrating Facial Cleanser is another great option that’s perfect for sensitive skin and packed with ceramides and hyaluronic acid. If you have oily or acne-prone skin, La Roche-Posay Effaclar Purifying Foaming Gel is a gentle foaming option that cleans without being harsh. For those who wear makeup, double cleansing with an oil-based cleanser like The Ordinary Squalane Cleanser before your regular face wash ensures every trace of makeup and sunscreen is removed. Pro tip: Wash your face with lukewarm water — hot water can dry out your skin, and cold water won’t effectively clean your pores. Make sure you’re cleansing morning and night for the best results. 2. Tone (Optional) – Balance and Prep Your Skin Toner isn’t a must, but it can make a huge difference, especially if you have specific skin concerns like large pores, acne, or uneven skin tone. A good toner balances your skin’s pH, removes any leftover impurities, and preps your skin for better absorption of serums and moisturizers. Witch Hazel Toner AMAZON Click here Ordinary Glycolic Acid AMAZON Click here I love Thayers Witch Hazel Toner (Alcohol-Free) — it’s soothing, gentle, and helps keep my skin calm and clear. If you’re looking for gentle exfoliation, The Ordinary Glycolic Acid Toner brightens and smooths skin over time. For hydration, Laneige Cream Skin Toner & Moisturizer is a great pick, especially for drier skin types. Pro tip: Apply toner with a cotton pad or your hands by gently pressing it into your skin instead of rubbing. It’s more soothing and helps prevent irritation. 3. Treat – Target Skin Concerns Like Acne, Dryness, or Hyperpigmentation When it comes to clean girl skin care, this is where you get a little more personal. Serums and treatments target specific issues like acne, dark spots, dryness, or dullness. The key is to pick products that target your skin’s unique needs without overcomplicating your routine. On days when I want an extra glow, I use: Vitamin C Serum (Morning): Helps brighten and even out my skin tone. I love Naturium Vitamin C Complex Serum — it’s effective and budget-friendly. Hyaluronic Acid Serum (Night): Adds deep hydration and keeps my skin plump and dewy. The Ordinary Hyaluronic Acid 2% + B5 is my go-to. Niacinamide Serum: Controls oil production and helps minimize pores. Good Molecules Niacinamide Serum works great without breaking the bank. If you deal with acne, La Roche-Posay Effaclar Duo is a lifesaver for keeping breakouts at bay. For hyperpigmentation, The Ordinary Alpha Arbutin 2% + HA helps fade dark spots over time. Pro tip: Apply serums after cleansing and toning but before moisturizing so they can penetrate your skin more effectively. Pat them in gently rather than rubbing. 4. Moisturize – Hydrate and Lock in Moisture Hydrated skin = healthy skin. Whether your skin is oily, dry, or somewhere in between, you need a good moisturizer to keep it balanced and glowing. Moisturizing helps maintain your skin barrier, prevent dryness, and give you that soft, dewy look. Lubriderm Daily Moisture Lotion AMAZON Click here CeraVe Daily Moisturizing Lotion AMAZON Click here I swear by Lubriderm Daily Moisture Lotion (Fragrance-Free) — it’s lightweight, non-greasy, and keeps my skin soft all day long. And yes, it’s technically a body lotion, but it works wonders on my face! If you’re looking for a dedicated face cream, CeraVe Daily Moisturizing Lotion is also amazing and filled with skin-loving ceramides. For extra hydration at night, Neutrogena Hydro Boost Gel Cream is perfect for locking in moisture without feeling heavy. If you have dry skin, First Aid Beauty Ultra Repair Cream gives intense hydration without being greasy. Pro tip: Apply your moisturizer on slightly damp skin to lock in extra hydration and avoid that tight, dry feeling. 5. Protect – Use Sunscreen (SPF) Every Morning, No Matter the Weather This step is non-negotiable. Sunscreen protects your skin from UV damage, prevents premature aging, and keeps your skin tone even. If you want that long-term clean girl glow, SPF is your best friend. My favorite is Neutrogena Ultra Sheer Dry-Touch SPF 55 — it’s lightweight, doesn’t leave a white cast, and works perfectly under makeup. For a more dewy finish, try Black Girl Sunscreen SPF 30. If you want a matte look, Supergoop! Unseen Sunscreen SPF 40 is a great choice. Even if you’re staying inside, wear sunscreen! UV rays can still reach you through windows. Extras You Can Add If You Want: Exfoliate (1–2x a week): Gently removes dead skin cells for a smoother, brighter complexion. Try The Ordinary Glycolic Acid Toner or Paula’s Choice BHA Liquid Exfoliant. Eye Cream: If you want to target dark circles, puffiness, or fine lines. I love CeraVe Eye Repair Cream — it’s hydrating without being too thick. Face Masks: For extra hydration, acne treatment, or brightening. Summer Fridays Jet Lag Mask is perfect
Clean Girl Makeup: A Step-by-Step Guide
Hey Girl, The clean girl makeup look is all about looking effortlessly put together. Think fresh, glowy skin, natural brows, and just enough makeup to enhance what’s already there. No heavy foundation. No over-the-top glam. Just a soft, radiant, everyday vibe. If you’re looking for a simple clean girl makeup guide. I’m gonna put you on to the easiest way to achieve this look. Step by step. Quick, simple, and effective. Let’s go! Step 1: Prepping Your Skin Clean girl makeup starts with skin that looks healthy and hydrated. And no, you don’t need an expensive 10-step skincare routine. I literally just wash my face with Dove soap and moisturize. That’s it. But whatever works for your skin—stick to it. Your base is everything. Make sure your skin is clean. Hydrate it well. A little bit of moisturizer or a dewy primer will make all the difference. Step 2: Lightweight Base Foundation? Not really. The clean girl look is all about letting your skin shine through. Use a tinted moisturizer, BB cream, or even just concealer. Dab it on where you need it—under the eyes, around the nose, maybe a little on the chin. Then blend. Use your fingers or a damp sponge. You’re not trying to cover everything, just even out your skin tone a little. Step 3: Concealing Imperfections If you need extra coverage, go in with a lightweight concealer. Something that melts into the skin and doesn’t look cakey. Tap, don’t rub. Blend it out with a damp sponge or your fingertips for a natural finish. If you have blemishes, dark circles, or hyperpigmentation, this step will make a big difference. Step 4: Natural, Fluffy Brows Clean girl brows are never overdrawn. They’re soft, lifted, and effortless. Brush your brows up with a clear or tinted brow gel. If you have sparse areas, lightly fill them in with a pencil or brow pen. Don’t overdo it. The goal is feathery, natural brows that frame your face beautifully. Step 5: Soft, Glowy Cheeks Blush is essential. It makes you look alive, fresh, and radiant. Go for a cream or liquid blush—something that melts into the skin. Peachy, rosy, or terracotta shades work best for that natural flush. Dab it on the apples of your cheeks and blend upwards. You can even add a little to your nose for that sunkissed effect. Step 6: Simple Eye Enhancement No heavy eyeshadow here. Just a little definition to make your eyes pop. If you want, take a light brown eyeshadow and blend it into your crease. That’s it. Super subtle. Curl your lashes. Apply a light coat of mascara. If you have naturally long lashes, you can even skip mascara and just brush them out. Step 7: The ‘Your Lips but Better’ Look Your lips should look plump, soft, and hydrated. No dry, cracked lips allowed. Use a lip liner close to your natural lip color and softly define your lips. Then top it with gloss, balm, or a sheer lipstick. A little trick? Dab some lip product on your cheeks for an extra flush of color. Step 8: Glow, but Make It Natural Highlighter is optional, but it takes the glow to the next level. Use a cream or liquid highlighter and tap a little on the high points of your face—cheekbones, nose, brow bone. No chunky glitter. Just a soft, natural glow like your skin is healthy and hydrated. Step 9: Setting the Look The last step. Lock it all in place. If you have dry skin, use a dewy setting spray. If you get oily, a light dusting of translucent powder will do the trick. You want your makeup to last all day without looking heavy. Final Thoughts That’s it! Simple, fresh, and effortless. This clean girl makeup routine will have you looking polished without looking overdone. You’ll get compliments like “you look so fresh” instead of “I love your makeup.” And that’s the goal. Try it out. You’ll never go back. Frequently Asked Questions How to have the clean girl look? To achieve the clean girl look, focus on fresh, glowy skin, natural brows, and a subtle makeup application. Start with a clean girl skincare routine to prep your skin. Then, follow a simple clean girl makeup tutorial step by step—light foundation or just a tinted moisturizer, soft eyeshadow, and a natural flush of blush. Finish the look with a clean girl ponytail or a sleek hairstyle for that effortlessly chic vibe. What is the correct order to apply makeup? The correct order to apply makeup is essential for a flawless clean girl makeup look. Here’s a quick guide: Skincare – Begin with your clean girl skincare routine to hydrate and prime your skin. Base – Apply a light foundation or tinted moisturizer for a natural, glowing finish. Brows – Use a brow gel or pencil to define your brows softly. Eyes – Apply a neutral eyeshadow, and use mascara to add volume to your lashes. Blush & Highlight – A soft blush and highlight will add a fresh, radiant touch. Lips – Finish with a tinted lip balm or gloss for a subtle pop of color. How to do a simple clean makeup look? A simple clean makeup look is all about enhancing your natural features. Follow these clean girl makeup steps: Start with your clean girl skincare routine for hydrated, dewy skin. Apply a lightweight foundation or BB cream to even out your skin tone. Fill in your brows with a brow gel or pencil for a natural look. Use a soft, neutral eyeshadow and mascara to accentuate your eyes without being over-the-top. Add a light flush of blush and a natural highlighter for a subtle glow. Finish with a nude lip balm or gloss to complete the look. How to be a clean girl for beginners? If you’re a beginner, start by simplifying your routine with a clean girl makeup guide. Begin with skincare—hydration is key for that clean girl glow. For makeup,
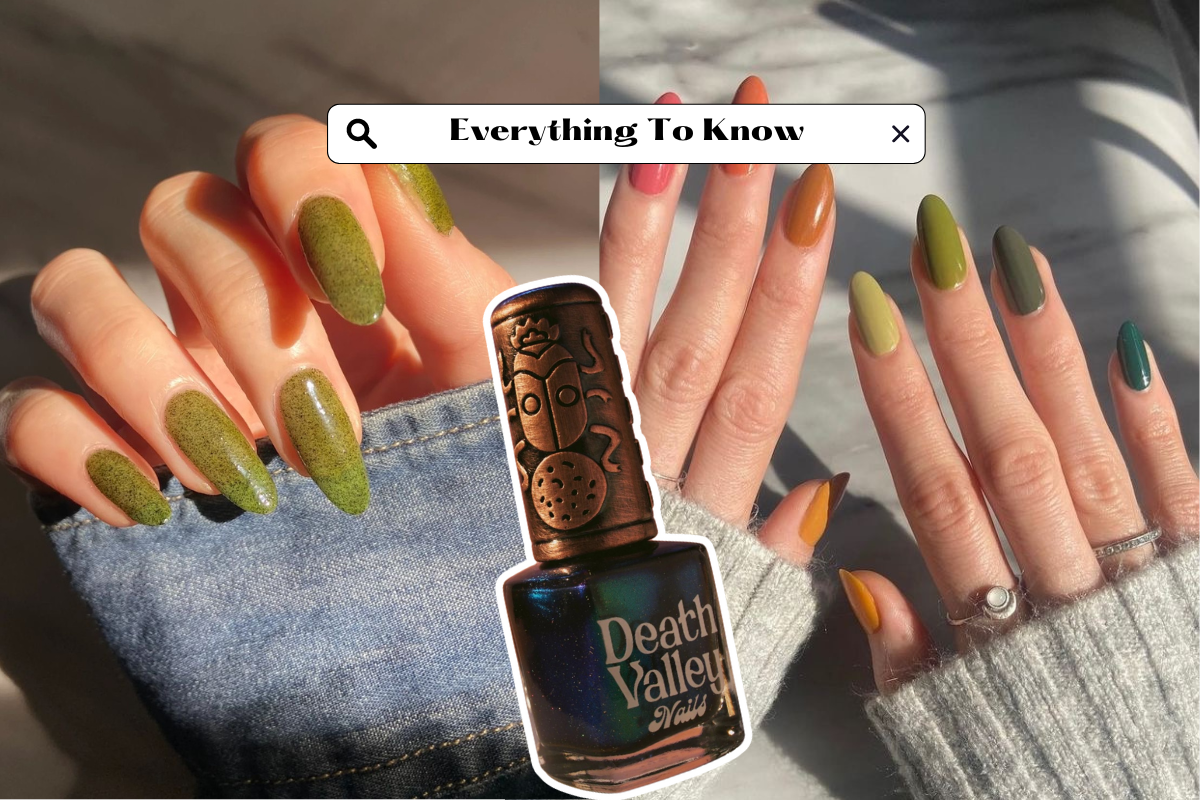
Are Death Valley Nails the Best Option for Your Nail Polish Collection?
Death Valley Nails is a must-know brand for anyone who loves experimenting with nail polish. If you’re always on the hunt for unique, eco-friendly shades, you’ve probably already come across this indie favorite. But what exactly makes this brand stand out from the others? In this post, we’ll dive into what makes Death Valley Nails so special, why their products are some of the best nail polish options on the market, and how to choose the perfect color for your skin tone. Plus, we’ll explore how Death Valley Nails compare to other nail polish brands. 1. What Are Death Valley Nails? Death Valley Nails is a brand that’s taking the beauty world by storm, offering a wide range of colors that cater to every style and preference. Their nail polish collections are known for being vegan and cruelty-free, making them a popular choice for environmentally-conscious individuals. With options ranging from classic shades to bold, vibrant hues, this brand has something for everyone. Nail Polish Color Variety Classic shades Bold, jewel tones Neutral tones and nude shades If you’re someone who enjoys wearing nude nails or prefers jewel tones, Death Valley Nails has it all. 2. How to Choose the Best Nail Polish for Your Skin Tone Selecting the right nail polish color for your skin tone can make a huge difference in how your nails look. Death Valley Nail Polish offers shades that complement both cool tones and warm skin tones. Here’s a quick guide on how to choose: For cool tones, opt for shades like icy blues or soft pinks. For warm skin tones, go for nude shades, terracotta, or rich oranges. The brand offers a variety of shades so you can always find something that matches your individual preferences. 3. Best Nail Polish from Death Valley Nails Are you wondering which colors to try? Here are some of the best nail polishes from Death Valley Nails: Nude Shades: Perfect for everyday wear. Jewel Tones: Great for a night out or a bold look. Classic Shades: These never go out of style. Don’t forget to finish with a top coat for that professional, long-lasting finish. 4. Nail Polish Brands and How They Compare How does Death Valley Nails compare to other brands like Sally Hansen? Many people appreciate the vegan and cruelty-free approach of Death Valley Nails, as well as their wide range of colors. While Sally Hansen offers excellent quality as well, Death Valley Nails focuses on creating products that are ethical and versatile for all skin tones. Death Valley Nails: Ethical and versatile, with a focus on vegan and cruelty-free products. Sally Hansen: Known for durability and offering a huge range of shades. Both brands are excellent, but your choice depends on your personal preferences. 5. Nail Care Tips with Death Valley Nails Taking care of your nails is essential if you want them to look their best. Here are some tips to ensure your polish lasts: Start with a base coat: This helps the polish adhere better to your nails. Choose the right color for your look: Whether you’re going for nude nails or something more vibrant, matching your polish to your outfit can make a big difference. Apply a top coat: This not only gives your nails a shiny finish but also helps the polish last longer. If you’re looking to remove your polish, make sure to use a good quality nail polish remover that won’t dry out your nails. 6. Why Death Valley Nails is Perfect for Any Occasion With their range of colors including both bold and subtle options, Death Valley Nails truly offers something for everyone. Whether you’re going for a sophisticated, neutral look with nude nails or a dramatic, bold style with jewel tones, there’s a color that fits your mood and style. Neutral tones for everyday elegance Bold colors for making a statement Vegan and cruelty-free formula for peace of mind. Conclusion So, are Death Valley Nails the right choice for your next manicure? If you’re looking for a brand that offers a wide range of colors, ethical practices, and the perfect polish for every skin tone, then the answer is yes! From nude shades to jewel tones, this brand has something to suit your style. Whether you’re a fan of classic shades or love experimenting with new trends, Death Valley Nails is definitely worth checking out. Shop now and find your perfect shade.
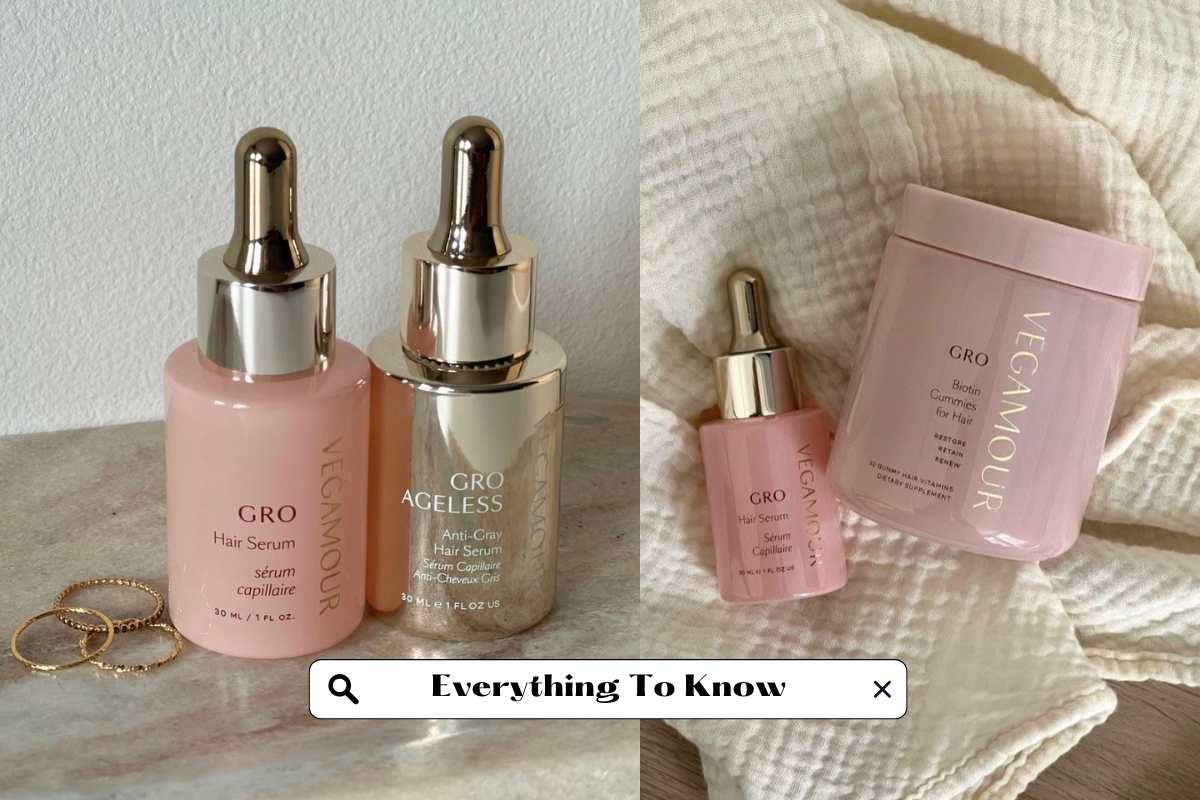
Are There Any Dupes for Vegamour? Discover the 10 Best Alternatives
Are there any dupes for Vegamour? If you’re searching for effective and affordable alternatives to Vegamour’s plant-based hair care products, you’re in luck. While Vegamour has become a popular choice for promoting fuller, thicker hair, its price point can be a bit steep. Fortunately, there are several budget-friendly dupes that deliver similar results. Keep reading to discover the 10 best dupes for Vegamour that will help you achieve luscious locks without breaking the bank. If you’re looking to achieve luscious locks on a budget, here are the 10 best dupes for Vegamour products that are both effective and wallet-friendly: 1. The Ordinary Multi-Peptide Serum for Hair Density This affordable alternative is loved for its simple yet effective formula. It’s packed with peptides that encourage hair growth and improve thickness. Similar to Vegamour’s GRO Hair Serum, The Ordinary’s serum nourishes the scalp and supports healthier hair. 2. Pura D’or Original Gold Label Anti-Hair Thinning Shampoo If Vegamour’s GRO Revitalizing Shampoo feels a bit too costly, Pura D’or offers a fantastic dupe. With natural ingredients like argan oil and biotin, this shampoo strengthens strands and promotes volume while reducing hair thinning. 3. EssyNaturals Hair Growth Oil This oil is a budget-friendly alternative to Vegamour’s GRO Hair Serum. It’s infused with a powerful mix of biotin, rosemary, and castor oil that helps boost hair growth, while also nourishing the scalp for stronger, healthier hair. 4. Viviscal Gorgeous Growth Densifying Elixir Viviscal’s Densifying Elixir is another great dupe for Vegamour’s hair serum. It’s lightweight, non-greasy, and packed with natural ingredients that promote hair thickness and strength. Plus, it’s perfect for daily use to help stimulate growth over time. 5. BondiBoost Hair Growth Shampoo BondiBoost’s hair growth shampoo is a fantastic alternative if you’re a fan of Vegamour’s Revitalizing Shampoo. Made with a mix of peppermint, rosemary, and saw palmetto, it helps stimulate the scalp and promote healthy hair growth, all while being more affordable. 6. Mielle Rosemary Mint Scalp & Hair Strengthening Oil This highly affordable oil works wonders for stimulating the scalp and encouraging growth, making it an excellent alternative to Vegamour’s scalp treatment oils. The rosemary mint formula boosts circulation, promoting healthier, thicker hair over time. 7. Briogeo Blossom & Bloom Ginseng + Biotin Volumizing Spray Briogeo’s volumizing spray is a wonderful dupe for Vegamour’s GRO Hair Foam. This lightweight mist adds volume and shine to the hair, while also nourishing the scalp with biotin and ginseng for long-term hair health. 8. Kate Blanc Castor Oil If you’re seeking a simple and effective solution for hair growth, castor oil is a tried-and-true method. Kate Blanc’s Castor Oil is organic, affordable, and delivers similar results to Vegamour’s GRO Serum when used consistently for scalp massages. 9. Keranique Hair Regrowth Treatment Keranique’s Regrowth Treatment is a great dupe for Vegamour’s serum, especially for those dealing with more serious thinning or hair loss. It uses 2% minoxidil to help stimulate hair growth and thicken the hair over time. 10. SheaMoisture Jamaican Black Castor Oil Strengthen & Restore Shampoo This shampoo is a great alternative to Vegamour’s GRO Revitalizing Shampoo. Enriched with Jamaican black castor oil and shea butter, it strengthens, restores, and promotes hair growth, making it a go-to for natural hair care enthusiasts. Conclusion: So, are there any dupes for Vegamour that actually work? Absolutely! These 10 alternatives provide similar benefits to Vegamour’s products, from boosting hair growth to improving thickness, all at a fraction of the price. The key to success is consistency—whichever dupe you choose, stick to your routine, and you’ll soon see beautiful results.
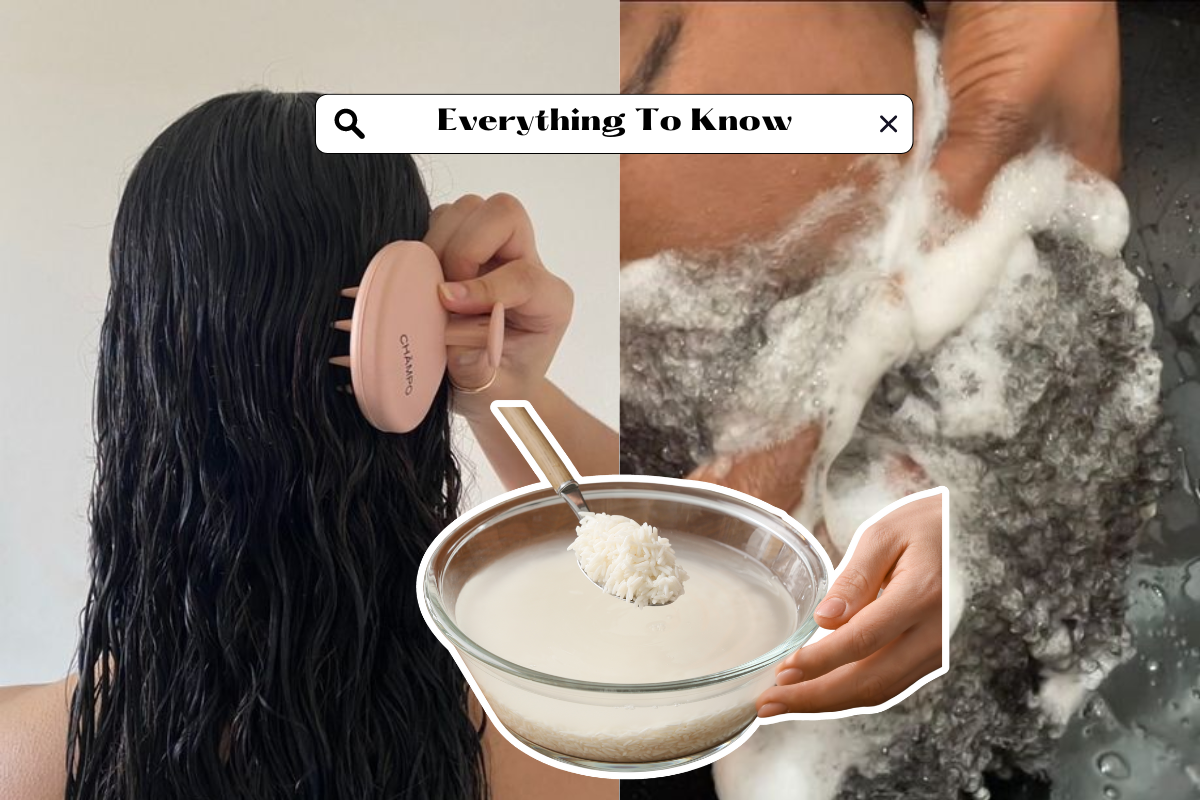
How to use Rice Water for Hair Growth
Rice water is one of the most affordable and effective natural remedies I’ve found for boosting hair health and growth. I first stumbled upon it while deep-diving into DIY hair treatments, and let me tell you—it’s far more than just a passing trend. Used for centuries in cultures like Japan and China, rice water is packed with nutrients that help strengthen, soften, and grow your hair. In this post, I’ll break down how it works, which products are worth trying (like rice water shampoo or hair masks), and how to use it based on your unique hair type. Let’s dive into what makes rice water a true game-changer What Makes Rice Water So Good for Your Hair? Rice water isn’t just a beauty buzzword—it’s a nutrient-rich powerhouse that’s been used for generations to keep hair strong and healthy. When I first started using rice it, I noticed my hair felt thicker and looked shinier within a few weeks. That’s because it is loaded with vitamins, minerals, and amino acids that help strengthen hair follicles and promote growth. Whether you’re rinsing your hair with homemade rice water or using a rice water shampoo, you’re giving your strands a boost of protein and antioxidants that can reduce breakage and improve elasticity. It’s like a superfood for your hair—helping it grow longer, stronger, and more resilient. Types of Rice Water Hair Products: Find What Works for You The beauty world has really embraced rice water for hair, and now there’s a whole range of products designed to fit different hair needs and lifestyles. Whether you prefer the ease of a rice water spray for quick hydration or the deep nourishment of a rice water hair mask, there’s something for everyone. Some popular options include: Rice water shampoo bars that gently cleanse while strengthening Rice water conditioner to lock in moisture and smooth frizz Rice water hair sprays for on-the-go hydration and shine Rice water hair masks that repair damage and boost vitality No matter your hair type or routine, incorporating a rice water product can help you tap into its natural strengthening and growth-promoting benefits. How to Use Rice Water Spray for your Hair If you’re looking for an easy way to add the benefits of rice water into your routine, a rice water spray is a perfect choice. I love using it because it’s so convenient—you can spritz it on whether your hair is damp or dry. Just spray generously on your roots and lengths, then gently massage or comb through to distribute evenly. It instantly adds hydration, shine, and strength without weighing your hair down. Plus, it’s a great refresher between washes! You can find ready-made rice water sprays or make your own at home with just a few simple ingredients. Either way, it’s a fantastic way to enjoy the nourishing power of rice water for hair growth on the go. Exploring Rice Water Hair Masks If you want to treat your hair to some serious TLC, rice water hair masks are where it’s at. I started using them whenever my hair felt dry or brittle, and the difference was noticeable—softer, smoother strands that felt revived. These masks are usually infused with botanical extracts and packed with the same vitamins and amino acids found in plain rice —but in a richer, more concentrated form. They penetrate deep into the hair shaft, repairing damage and locking in moisture for lasting health. Using a rice water hair mask once or twice a week can really boost your hair’s strength and shine, especially if you have heat or color damage. Trust me, it’s like a spa day for your hair! Debunking Myths: Is Rice Water Good for Low Porosity Hair? There’s a lot of mixed info online about using rice water for low porosity hair, so let’s clear the air. Many people worry that it will weigh down their hair or cause buildup, but when used correctly, it can actually be a great addition to your routine. The trick with low porosity hair is to make sure you don’t overuse rice water or apply it without rinsing properly. Because this hair type tends to resist moisture, using rice water in moderation—like a light spray or a diluted rinse—can help strengthen strands without leaving residue. I’ve seen plenty of folks with low porosity hair benefit from rice water by focusing on proper application and pairing it with moisturizing conditioners. So yes, rice water can work well for low porosity hair—you just have to tailor it to your hair’s needs. Before and After: The Real Impact of using Rice Water for Hair Growth When I first started using rice water for hair growth, I was honestly skeptical. But after a few weeks, I noticed real changes—my hair felt stronger, looked shinier, and breakage slowed way down. The before and after photos I took showed a clear difference: from dull and brittle strands to soft, vibrant locks. What surprised me most was how much healthier my scalp felt too, which I later learned is a big part of how rice water promotes growth. It’s not an instant fix, but with consistent use, the vitamins and amino acids in rice water really helped my hair bounce back. Seeing my own transformation firsthand convinced me that rice water isn’t just a beauty trend—it’s a genuinely effective natural treatment that can work for so many hair types. Final Thoughts: Why I’ll Always Keep Rice Water in My Routine After trying countless products and routines over the years, it has easily become one of the few hair care staples I actually stick with. It’s simple, natural, and genuinely works. Whether I’m using a rice water shampoo, doing a weekly hair mask, or spritzing a bit of Jasmine rice water on my ends, I can feel and see the difference. If you’ve been wondering whether rice water is worth the hype—yes, it absolutely is. From less shedding to faster growth and shinier, healthier strands, I’ve experienced it all firsthand. So if you’re

50 Silver Ombre Nails for 2025
As we step into the vibrant spring-summer season of 2024, it’s time to revamp our style and embrace the latest nail trends. Among the myriad of choices, one trend stands out for its timeless elegance and versatility: silver ombre nails. Whether you have long, short, or somewhere in-between nails, this nail art is sure to elevate your summer look to the next level. Classic silver ombre with a matte finish 50 Unique Silver Ombre Nail Designs Classic silver ombre with a matte finish. Silver ombre with a holographic glitter accent nail. Gradient silver ombre with a floral pattern. Silver ombre with geometric silver foil accents. Silver ombre with delicate silver leaf detailing. Reverse silver ombre (dark silver to light silver). Silver ombre with a marble effect. Silver ombre with rhinestone accents. Silver ombre with negative space design. Silver ombre with metallic stud embellishments. Silver ombre with a French tip twist. Silver ombre with a moon phase design. Silver ombre with shattered glass effect. Silver ombre with iridescent pearl accents. Silver ombre with a gradient glitter effect. Silver ombre with celestial motifs (stars, moons). Silver ombre with a watercolor floral design. Silver ombre with ombré glitter. Silver ombre with minimalist line art. Silver ombre with a chrome mirror finish. Silver ombre with metallic stripes. Silver ombre with holographic unicorn accents. Silver ombre with a mermaid scale pattern. Silver ombre with tribal-inspired accents. Silver ombre with 3D gemstone embellishments. Silver ombre with a shattered mirror effect. Silver ombre with delicate lace detailing. Silver ombre with abstract splatter art. Silver ombre with a gradient gemstone effect. Silver ombre with caviar beads. Silver ombre with floral stamping. Silver ombre with matte black accents. Silver ombre with delicate silver foil accents. Silver ombre with glittery moon and stars. Silver ombre with chrome flakes. Silver ombre with a paisley pattern. Silver ombre with a vintage filigree design. Silver ombre with metallic swirls. Silver ombre with holographic butterfly accents. Silver ombre with a celestial gradient. Silver ombre with lace cutout accents. Silver ombre with gradient gemstone clusters. Silver ombre with abstract marble swirls. Silver ombre with delicate snowflake accents. Silver ombre with shattered glass foil. Silver ombre with metallic floral accents. Silver ombre with gradient glitter moons. Silver ombre with pastel rainbow accents. Silver ombre with metallic cursive script. Silver ombre with iridescent bubble accents. Silver ombre nails offer a dazzling gradient effect that transitions seamlessly from a soft, shimmering silver at the base to a more intense metallic hue at the tips. The result? A mesmerizing manicure that catches the light with every movement, reminiscent of glistening sunlight on water. For those with shorter nails, silver ombre designs are a godsend. They elongate the nails visually, giving the illusion of length while adding a touch of glamour that’s perfect for summer soirées or casual outings alike. Plus, the gradient effect adds depth and dimension, making your nails a true work of art. At the forefront of the nail art scene are talented nail artists who continuously push the boundaries of creativity. With silver ombre nails, these artists showcase their skillful techniques, blending shades seamlessly and incorporating intricate designs that mesmerize and inspire. But why limit silver ombre nails to just one season? While they certainly shine during the spring-summer months, they can also transition seamlessly into fall and winter, adding a hint of icy elegance to your manicure repertoire. As we delve deeper into the realm of nail designs, it’s evident that silver ombre nails are more than just a passing trend—they’re a timeless classic with a contemporary twist. From minimalist chic to bold and edgy, there’s a silver ombre design to suit every style and personality. Incorporating silver ombre nails into your summer nail repertoire is not only fashionable but also practical. The metallic hues complement a wide range of outfits, from breezy sundresses to sleek evening ensembles, making them a versatile choice for any occasion. So, whether you’re lounging poolside, strolling along the beach, or attending a glamorous rooftop soirée, let your nails do the talking with stunning silver ombre designs. Embrace the spirit of spring-summer 2024 with a manicure that’s as radiant and captivating as the season itself. Silver ombre nails offer a dazzling gradient effect that transitions seamlessly from a soft, shimmering silver at the base to a more intense metallic hue at the tips. The result? A mesmerizing manicure that catches the light with every movement, reminiscent of glistening sunlight on water. For those with shorter nails, silver ombre designs are a godsend. They elongate the nails visually, giving the illusion of length while adding a touch of glamour that’s perfect for summer soirées or casual outings alike. Plus, the gradient effect adds depth and dimension, making your nails a true work of art. At the forefront of the nail art scene are talented nail artists who continuously push the boundaries of creativity. With silver ombre nails, these artists showcase their skillful techniques, blending shades seamlessly and incorporating intricate designs that mesmerize and inspire. But why limit silver ombre nails to just one season? While they certainly shine during the spring-summer months, they can also transition seamlessly into fall and winter, adding a hint of icy elegance to your manicure repertoire. As we delve deeper into the realm of nail designs, it’s evident that silver ombre nails are more than just a passing trend—they’re a timeless classic with a contemporary twist. From minimalist chic to bold and edgy, there’s a silver ombre design to suit every style and personality. Incorporating silver ombre nails into your summer nail repertoire is not only fashionable but also practical. The metallic hues complement a wide range of outfits, from breezy sundresses to sleek evening ensembles, making them a versatile choice for any occasion. So, whether you’re lounging poolside, strolling along the beach, or attending a glamorous rooftop soirée, let your nails do the talking with stunning silver ombre designs. Embrace the spirit of spring-summer 2024 with a manicure that’s as radiant and captivating as
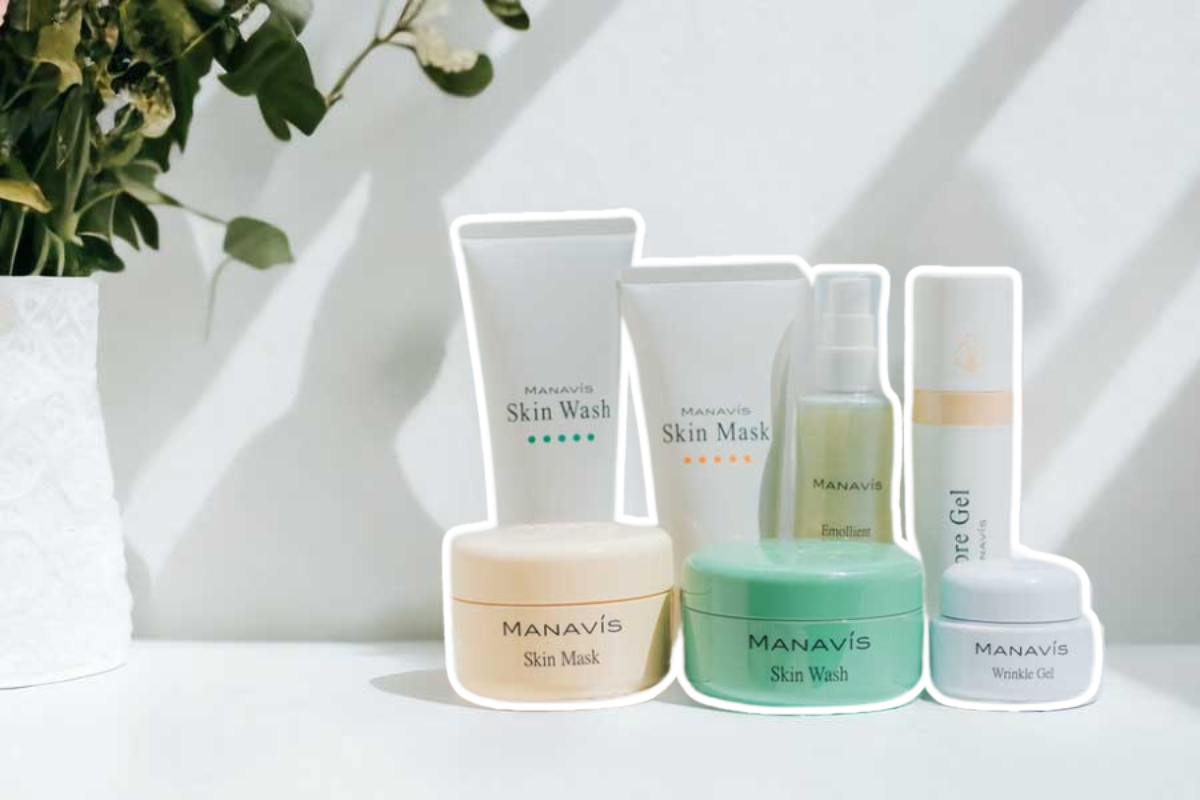
Manavis Skincare: An Honest Review
In the ever-evolving world of skincare, Manavis skincare offers consumers products that are not only effective but also gentle and natural. Enter Manavis Skin care, a game-changer in the realm of skincare routines. With a focus on harnessing the potency of plant-derived ingredients, Manavis offers a range of products designed to nourish and rejuvenate your skin, all while embracing the power of nature. Review: Embracing Nature’s Bounty with Manavis Skincare I recently had the pleasure of trying out Manavis Skincare, and I must say, I’m thoroughly impressed. From their commitment to plant-derived ingredients to the noticeable results on my skin, Manavis has exceeded my expectations in every way. First and foremost, I love the ethos behind Manavis. Their dedication to harnessing the power of nature’s bounty is evident in every product they offer. Knowing that I’m nourishing my skin with ingredients sourced directly from plants gives me peace of mind, and I appreciate their commitment to sustainability and environmental responsibility. One of the standout features of Manavis Skincare is their use of fatty acids. These essential nutrients are crucial for maintaining healthy, radiant skin, and Manavis incorporates them beautifully into their formulations. Since incorporating Manavis products into my skincare routine, I’ve noticed a significant improvement in the hydration and overall texture of my skin. It feels softer, smoother, and more supple than ever before. The use of olive oil in many of their products is another highlight for me. Olive oil has long been celebrated for its skincare benefits, and I can see why. It’s incredibly nourishing and soothing, leaving my skin feeling pampered and rejuvenated after each use. Whether it’s their cleansers, moisturizers, or serums, the addition of olive oil adds an extra layer of luxury to the Manavis experience. But perhaps what I appreciate most about Manavis Skincare is the results it delivers. After just a few weeks of consistent use, my skin looks noticeably brighter and more radiant. I’ve also noticed a reduction in the appearance of fine lines and wrinkles, a testament to the effectiveness of Manavis’ formulations. Overall, I can’t recommend Manavis Skincare enough. If you’re looking for products that are not only effective but also gentle and nurturing to your skin, look no further than Manavis. Embrace the power of nature and treat your skin to the luxurious experience it deserves with Manavis Skincare. Plant-Derived Goodness At the heart of Manavis Skin care lies a commitment to harnessing the natural goodness of plants. Unlike many conventional skin care products that rely on synthetic compounds, Manavis opts for ingredients sourced directly from nature. By utilizing plant-derived extracts, Manavis ensures that its products are not only effective but also gentle and nurturing to the skin. Skin Wash Reinvented A good skincare routine starts with a proper cleanse, and Manavis Skin care takes this fundamental step to the next level. Their skin wash formulations are carefully crafted to gently yet effectively cleanse the skin, removing impurities without stripping away its natural oils. Infused with plant-derived ingredients such as olive oil, Manavis skin washes offer a luxurious cleansing experience that leaves your skin feeling refreshed and rejuvenated. Embracing the Power of Olive Oil Olive oil has long been celebrated for its skin care benefits, and Manavis incorporates this wonder ingredient into many of its products. Rich in fatty acids and antioxidants, olive oil helps to nourish the skin, leaving it soft, supple, and radiant. Whether used in moisturizers, cleansers, or serums, olive oil is a cornerstone of Manavis Skin care’s commitment to natural and effective skin care solutions. A Holistic Approach to Beauty Beyond just providing skin care products, Manavis advocates for a holistic approach to beauty that encompasses both physical and emotional well-being. By prioritizing natural ingredients and sustainable practices, Manavis not only cares for your skin but also for the planet. With Manavis Skincare, you can feel confident knowing that you’re nourishing your skin with the best that nature has to offer while supporting environmentally-conscious practices. Conclusion In a world inundated with skin care options, Manavis stands out for its commitment to quality, efficacy, and sustainability. With a focus on plant-derived ingredients, including the powerhouse olive oil, Manavis Skincare offers a natural and effective approach to skincare that caters to the needs of modern consumers. Elevate your skincare routine with Manavis and experience the transformative power of nature’s bounty.
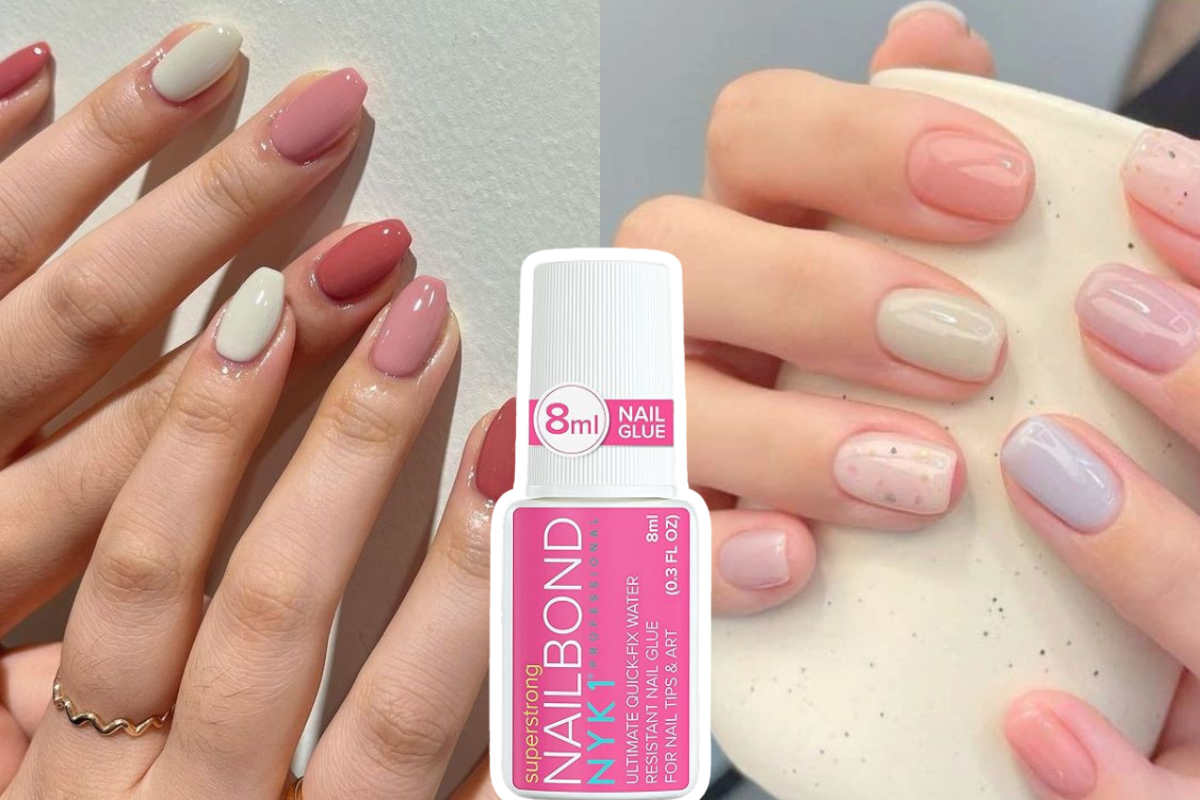
I Tried the Beauty Secrets Nail Glue: Honest Review
Looking for a nail glue that delivers both performance and peace of mind? Meet Beauty Secrets Nail Glue, the go-to solution for flawless, long-lasting nails. Whether you’re a DIY pro or just starting out, this product offers precision and reliability. Designed with a no-drip applicator, its clog-proof formula ensures an effortless, mess-free application every time. Plus, it’s 100% vegan and free from gluten and parabens, making it perfect for health-conscious users. Elevate your nail game with Beauty Secrets Nail Glue and enjoy salon-quality results from the comfort of your home. Product Details of the Beauty Secrets Nail Glue: Let’s dive deeper into the wonders of Beauty Secrets Nail Glue. This little gem isn’t just your average adhesive – it’s a game-changer. With its innovative applicator designed to prevent drips and spills, you can say goodbye to messy mishaps during application. Plus, its clog-proof formula ensures a smooth flow every time, eliminating the frustration of dealing with dried-up glue tubes. And here’s the best part – it’s 100% vegan, crafted without gluten and parabens, making it a top choice for conscious consumers who prioritize both performance and safety. Get Salon-Worthy Nails Ready to take your manicure to the next level? Look no further than Beauty Secrets Nail Glue. With its innovative formula and mess-free application, this product is a game-changer for nail enthusiasts everywhere. TAKE A LOOK Pros and Cons: Now, let’s talk about what sets this glue apart from the rest. The longevity is unreal – my nails stayed put for over a week, withstanding the daily grind of my nursing duties without a hitch. But, and here’s where the plot thickens, its rapid drying time can catch you off guard. Trust me; I’ve had a couple of instances where my fingers ended up glued together in a comedy of errors. It’s a small price to pay for such impeccable performance, but worth noting nonetheless.. Great for Mending and Nail Glue for Tips: Oh, did I mention it? Beauty Secrets Nail Glue isn’t just for affixing tips – it’s a superhero when it comes to mending broken nails too. Say goodbye to unsightly cracks and chips, because this glue has got you covered. Whether you’re rocking a full set of tips or just need a quick fix, Beauty Secrets is your go-to. Application Tips: When it comes to applying Beauty Secrets Nail Glue, preparation is your best friend. Take the time to give your nails some TLC before diving into the application process. Start by lightly filing and buffing your natural nails to create a smooth surface for optimal adhesion. Next up, it’s time to clean those nails! Grab some alcohol and give both your natural nail and the artificial nail a thorough wipe-down. This step ensures that there’s no dirt, oil, or residue that could interfere with the glue’s bonding power. Now, here’s where the magic happens – the application of the glue. But before you dive in, take a moment to familiarize yourself with the ingenious design of the Beauty Secrets Nail Glue. That’s right, I’m talking about that trusty yellow button to puncture. When you’re ready to apply the glue, gently squeeze the tube while keeping an eye on that yellow button. Once you’ve pierced it, you’ll unleash a steady flow of glue that’s ready to work its magic. But here’s a pro tip – don’t go overboard with the squeezing. A little goes a long way with this powerful adhesive. Now, it’s time to get down to business. Carefully apply the glue onto the nail tip, ensuring even coverage for maximum hold. And remember, time is of the essence! You’ve only got a few precious seconds to position the nail correctly before the glue sets. So, work quickly but with precision. Once you’ve placed the nail in position, hold it firmly for a few seconds to allow the glue to set. And just like that, you’re one step closer to achieving flawless, long-lasting nails with Beauty Secrets. So, whether you’re a seasoned pro or a newbie to the world of DIY nails, these application tips will help you get the most out of your Beauty Secrets Nail Glue. With a little prep and a touch of finesse, you’ll be rocking salon-worthy nails in no time. The Verdict: Let’s wrap things up with my final thoughts on Beauty Secrets Nail Glue. After putting this product to the test, I can confidently say that it’s a game-changer in the world of nail care. Whether you’re a seasoned nail aficionado or someone just dipping their toes into the world of DIY manicures, Beauty Secrets Nail Glue is the ultimate companion for achieving salon-quality results from the comfort of your own home. Say goodbye to the days of shelling out big bucks at the salon and hello to long-lasting, flawless nails that you can rock with confidence. With Beauty Secrets Nail Glue in your arsenal, you’ll never look back. In conclusion, if you’re in the market for a reliable nail glue that delivers on its promises, look no further than Beauty Secrets Nail Glue. Trust me; you won’t be disappointed. Disclaimer: Before you embark on your nail journey with Beauty Secrets Nail Glue, it’s essential to exercise caution and follow the recommended application instructions diligently. While this product is designed to enhance your nail care routine, it’s crucial to be mindful of any potential sensitivities or reactions. If irritation occurs, discontinue use immediately and consult with a healthcare professional. Your nails deserve the best, so always prioritize safety and care in your beauty routine.
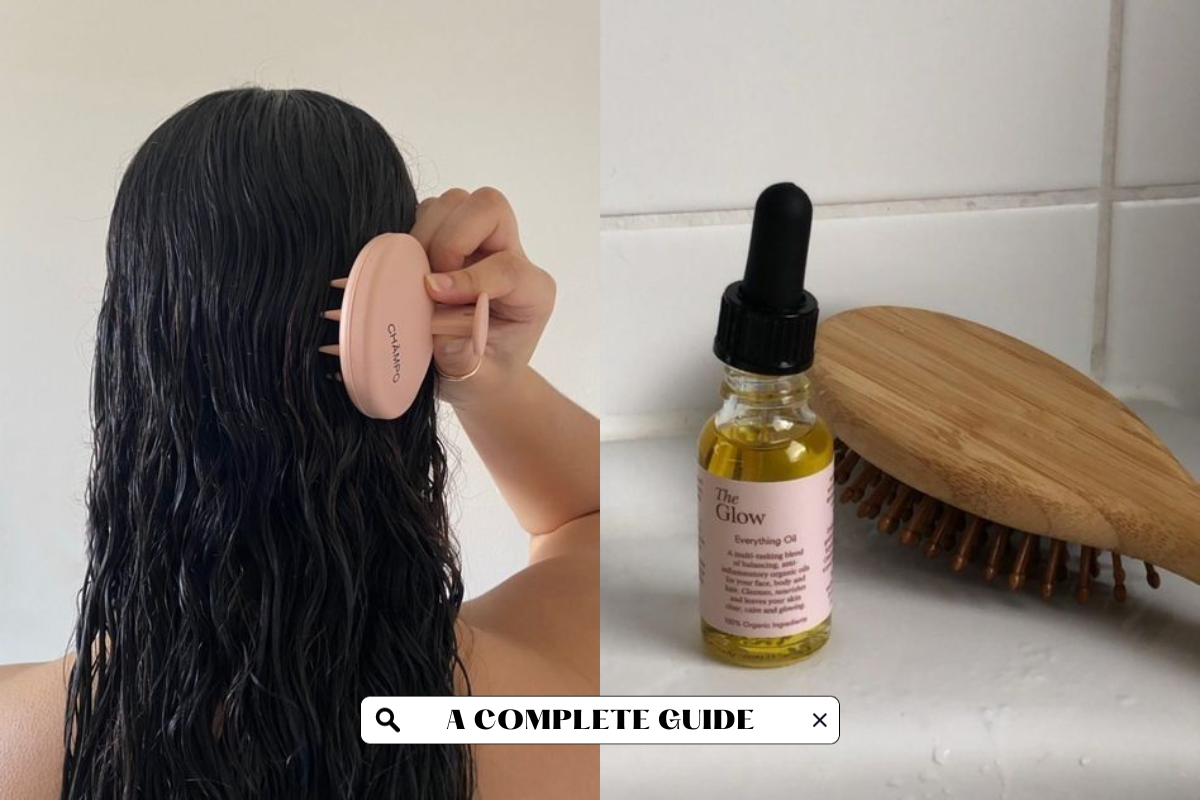
Unlock the Secrets to Healthy Hair Growth
Having luscious, vibrant locks is a common desire for many, but achieving and maintaining healthy hair growth requires a holistic approach. In this guide, we’ll delve into essential aspects of hair care, including the role of vitamins and nutrients, the power of oils, the significance of keratin, protein treatments, caffeine for follicle stimulation, the importance of regular trims, the right shampoo choices, minimizing hair-touching habits, and establishing a consistent hair care routine. What Vitamins Help Hair Growth? If you’ve ever wondered what vitamins help hair growth, you’re not alone. Your hair needs the right nutrients to grow longer, stronger, and healthier. Without them, you may notice breakage, thinning, or slow growth. Here are the top hair growth vitamins you should know: Biotin (Vitamin B7) Biotin is one of the most talked-about hair growth vitamins, and for good reason—it helps your body produce keratin, the protein that forms the structure of your hair. A lack of biotin can lead to thinning, brittle strands. You’ll find biotin naturally in foods like eggs, nuts, and seeds, but it’s also a star ingredient in many hair growth products, like biotin-enriched shampoos and supplements, heck, you can even find it in rice water. If you’re struggling with hair fall, adding a daily biotin hair growth vitamin could help support stronger, thicker strands. Vitamin A Vitamin A supports the production of sebum, your scalp’s natural oil, which keeps hair moisturized and protected. Leafy greens, carrots, and sweet potatoes are all rich in this vitamin. Many dermatologist-approved hair growth products include vitamin A for its nourishing benefits—especially in scalp oils and serums that target dryness and breakage. Vitamin E Vitamin E acts as a powerful antioxidant that protects your hair follicles from damage while boosting circulation to the scalp. It’s found in foods like almonds and avocados, but also features heavily in hair growth serums designed to improve shine, strength, and overall hair texture. Biotin | Collagen | Keratin – Clinically Tested Supplement AMAZON Click here Swanson Beta-Carotene Vitamin A AMAZON Click here Using Hair Growth Oils That Actually Work If you’re trying to figure out how to make your hair grow faster, incorporating the right hair growth oil into your routine is a game-changer. Oils not only nourish your scalp but also strengthen your strands, reduce breakage, and improve shine—all of which support healthier, longer hair. Rosemary Oil for Hair Growth One of the most effective natural oils, rosemary oil has been shown to stimulate hair follicles and improve scalp circulation—similar to the effects of Minoxidil. Regular scalp massages with rosemary oil can help thicken hair over time. You’ll find it as a key ingredient in popular products like Wishcare Hair Growth Serum, which blends rosemary with biotin for double the growth benefits. Castor Oil Known for its high ricinoleic acid content, castor oil deeply conditions the scalp and encourages growth at the root. It also adds thickness to thinning areas and strengthens the hair shaft. Castor oil works well when used as a hot oil treatment or mixed with a few drops of essential oils like peppermint or tea tree. Pure & Natural Rosemary Oil for Hair AMAZON Click here Castor Oil 4oz, USDA Certified Organic Oil AMAZON Click here Argan Oil Packed with antioxidants, vitamin E, and essential fatty acids, argan oil is perfect for taming frizz and sealing moisture into dry or damaged hair. While it may not directly speed up the hair growth cycle, it helps retain length by preventing breakage and split ends—key factors if you’re aiming for longer hair. Coconut Oil A classic go-to, coconut oil penetrates the hair shaft to reduce protein loss, making it especially helpful for damaged or high-porosity hair. Use it as an overnight treatment or pre-wash mask to reduce breakage and support growth over time. How to Use Oils for Hair Growth: Massage your chosen oil into your scalp 2–3 times a week. Leave it on for at least 30 minutes—or overnight if you prefer—then wash out with a gentle, sulfate-free shampoo. For best results, pair your oil treatments with a consistent hair care routine and a nutrient-rich diet. Keratin and Protein Treatments: Strengthen Hair from the Inside Out Hair that’s dry, brittle, or breaking easily? You may not need more moisture—you might need more protein. Since your hair is made mostly of keratin (a fibrous protein), restoring that protein through targeted treatments is essential for strong, healthy growth. Why Keratin Matters Keratin gives your hair its structure, strength, and flexibility. But heat styling, coloring, and even sun exposure can wear it down, making your hair more vulnerable to breakage and slow growth. Replenishing lost keratin helps rebuild the hair shaft from the inside out—leading to smoother, shinier, and stronger strands. Benefits of Protein Treatments for Hair Growth Protein treatments fill in gaps in damaged hair, restore elasticity, and reduce split ends and breakage. While they don’t directly speed up the hair growth cycle, they play a crucial role in retaining length—which is just as important when trying to grow your hair faster. You’ll find protein-rich hair growth products in many forms: Leave-in treatments Protein masks Keratin-infused shampoos and conditioners Salon-grade keratin smoothing treatments These are especially helpful for chemically treated, bleached, or textured hair that needs extra strength and support. How Often Should You Use Protein Treatments? Protein treatments are powerful, but using them too often can cause your hair to become stiff or dry. For most hair types, a deep protein mask every 4–6 weeks is enough. If your hair is extremely damaged, you might benefit from weekly light treatments until it regains strength. Regular Trims: The Secret to Longer, Healthier Hair It might sound counterintuitive, but if you want to grow your hair faster, you need to trim it regularly. Skipping trims in hopes of keeping every inch often leads to more breakage and thinner ends, which slows your progress. Why Trimming Helps Hair Growth Trims don’t make your hair grow faster at the root, but they do help you retain length