
You’ve probably seen oversized blazers everywhere lately, and if you’re wondering how to make them work for you, you’re not alone. The key to styling an oversized blazer is balancing its roomy fit with pieces that highlight your shape, like belted waists, fitted bottoms, or layers that add structure. This way, you avoid looking swallowed up by fabric and still keep that cool, laid-back vibe. The beauty of oversized blazers is how versatile they are. You can dress them up for work, pair them with jeans for weekend errands, or even wear them as a chic dress for a night out. With just a few simple styling tricks, your blazer instantly becomes a go-to piece that upgrades any outfit while keeping you comfortable and confident. Whether you’re new to this trend or want fresh ideas, learning how to style oversized blazers is easier than you think. Stick around because these looks will show you how to mix casual and polished vibes while making sure your style feels totally you. Pair With Fitted Bottoms When you throw on an oversized blazer, the key to keeping your look fresh is balance. You don’t want to look like you borrowed a jacket from your dad’s closet without a plan. Pairing your blazer with fitted bottoms instantly sharpens your silhouette. Think skinny jeans, slim trousers, or a pencil skirt. These pieces hug your shape and stop the blazer from overwhelming your frame. Imagine slipping into high-waisted skinny jeans, the blazer slightly open to show off your waist—hello, chic and effortless! If you want to add some edge, leather pants are your best friend. A sleek pair of black leather pants with your oversized blazer gives off cool-girl vibes without trying too hard. Underneath, keep it simple with a fitted tee or blouse to avoid extra bulk. Here’s a quick list to get you started: Skinny jeans Tailored trousers Pencil skirts Leather pants Bonus tip: Tucking in your top under the fitted bottoms keeps everything looking polished. It’s like giving yourself a little nudge to look put together, even if you rolled out of bed five minutes ago. Your oversized blazer deserves a partner that lets it shine without stealing the spotlight. Layer Over Dresses Or Skirts Imagine slipping on a flowy dress that feels like a soft hug, then throwing an oversized blazer over it like a stylish shield. This combo adds a touch of cool and keeps you warm, especially on those days when the weather can’t decide. Whether your dress is short, midi, or even a slip style, the blazer adds shape and polish without stealing the show. If you’re feeling a little adventurous, try belting your blazer at the waist. This move turns the whole thing into a flattering silhouette, showing off your curves while keeping that effortlessly chic vibe. Pair it with knee-high boots or some strappy heels, and you’re ready for brunch, a date, or even a casual day at work. Don’t stop at dresses! Skirts love this treatment too. A mini or midi skirt under an oversized blazer balances the masculine touch of the blazer with something soft and feminine. Top it off with sheer or opaque stockings to add texture and a hint of mystery. Tips to nail this look: Choose slip or bodycon midi dresses for sleek contrast Belt your blazer to define your waist Match with boots or heels to elevate the whole outfit Add delicate jewelry to keep it feminine and fun This mix makes your outfit feel fresh but totally wearable — like you just stepped out of a fashion-forward daydream! Monochrome & Neutral Looks Picture this: you want to wear your oversized blazer but keep things sleek and simple. Going monochrome is your best friend here. Choose all one color — like black, white, or beige — and let your blazer be the centerpiece. For example, try a black oversized blazer with a black top and skinny pants. It feels polished but still a little edgy. Plus, monochrome outfits stretch your silhouette, so you won’t get swallowed up by the blazer’s volume. Neutrals like beige, cream, and gray are also perfect if you like a soft, cozy vibe. Pair your blazer with neutral pants or a skirt. Add delicate gold or silver jewelry to keep it light and feminine. Quick tips for the look: Match tones closely for a clean line. Play with fabrics — mix knits and silk for texture. Keep accessories simple to avoid overloading the outfit. When you wear monochrome or neutrals, you’re basically giving your outfit a glow-up without trying too hard. It looks sophisticated, feels comfortable, and works everywhere—from a casual brunch to an evening meet-up. Your oversized blazer becomes this cool statement without stealing the show. Casual & Street Style Imagine slipping on an oversized blazer and instantly leveling up your chill day look. Pair it with your favorite jeans and a simple tee, and you’ve got that perfect mix of relaxed but polished. It’s like saying, “I woke up like this, but make it fashion.” For a cool street vibe, try layering your blazer over a cozy hoodie. It’s comfy meets edgy, and you’ll look effortlessly put together whether you’re grabbing coffee or hitting the shops. Add joggers or sneakers to keep it casual but still stylish enough to catch eyes. If you want to go even bolder, mix textures and colors. Like an oversized black blazer with a white tee and distressed jeans—then finish with chunky sneakers and a gold chain. This combo says you mean business but you’re not afraid to play. Style tips: Keep your silhouette balanced. If your blazer is oversized, go for slimmer pants or fitted layers underneath. Accessorize smartly—a cute bag or statement earrings can lift the look without overdoing it. Don’t forget your shoes! Sneakers or ankle boots keep it grounded and wearable. Your oversized blazer isn’t just a piece. It’s your wardrobe’s secret weapon for when you want to look fabulous but stay comfy and casual.
Travel Packing Checklist To Keep Your Getaway Stress-Free And Stylish
Traveling is exciting, but packing can quickly turn into a stress fest. She knows the feeling—standing in front of an open suitcase, unsure what to bring or leave behind. A solid travel packing checklist takes the guesswork out of the process and helps travelers pack smart, saving time and avoiding last-minute panic. What should go in a bag? Clothes, toiletries, electronics, and a few must-have extras all need to fit just right. Keeping it simple and organized is key, so they don’t end up lugging around too much or forgetting essentials when it counts the most. With a smart packing checklist, travelers can focus on the fun bits of their trip, not the stuff left behind or the chaos at the airport. This guide covers everything needed to pack like a pro—no stress, no overpacking, just smooth travel vibes. Downloadable Travel Packing Checklist She knows that packing can get messy fast. That’s why a downloadable travel packing checklist is a total lifesaver. It keeps everything neat, easy, and just a few clicks away. No last-minute scrambling for that charger or toothpaste! These checklists often come as printable PDFs or editable files. She can download it, print it out, and tick off items one by one. Seeing her progress in black and white makes packing feel less like a headache and more like a small win before the trip even begins. A typical checklist includes: Clothing essentials (think socks, underwear, and a jacket) Toiletries (toothbrush, travel-sized shampoo, sunscreen) Tech gear (phone charger, headphones, power bank) Travel documents (passport, tickets, reservation confirmations) Some lists even remind her about small but important extras, like medications, chargers for different devices, and a book to fly through. The best part? These checklists are organized by category to prevent overpacking and forgetting key items. She can customize it too. Maybe she’s headed to a beach, so swimsuits move to the top priority. Or a winter getaway that demands layering pieces. With a downloadable checklist, packing stays tailored and stress-free. On her phone or on paper, this simple tool helps her pack smarter. It turns overpacking, forgetfulness, and last-minute anxiety into a calm, satisfying start to the adventure. Travel Packing List — Up To 30 Essential Items Packing can feel like a rollercoaster, but sticking to a solid list helps cut through the chaos. Here’s a handy list of up to 30 essentials to keep your trip smooth and stylish. Clothing basics: 3-4 T-shirts or tops 2 pairs of pants or shorts 1 dress or skirt (because you never know) 1 light jacket or sweater Enough underwear and socks for your trip A swimsuit if you’re hitting the beach or pool Toiletries: Toothbrush and toothpaste Travel-sized shampoo and conditioner Deodorant Sunscreen Makeup basics (if they wear it) Hairbrush or comb Tech & essentials: Phone and charger Headphones Portable power bank Travel documents (passport, tickets, ID) Wallet with cards and some cash Other must-haves: Sunglasses Reusable water bottle Small first aid kit (band-aids, pain relievers) Travel-size laundry detergent for any emergency washes A tote or day bag for exploring Choosing versatile items that mix and match saves space and stress. This list keeps them ready for weekends, city breaks, or longer adventures without the drama of “Did I forget something important?” Conclusion — Stress-Free Travel Starts With A Checklist She knows the stress of last-minute packing all too well. But a solid checklist turns packing chaos into calm, setting the tone for a smooth trip. Using a checklist helps her remember essentials without overload. No more: “Did I pack my passport?” or “Where’s that charger?” It’s all there, checked off and ready to go. Here’s why a checklist is a travel game-changer: Saves Time: Quickly glance and pack instead of panicking. Prevents Forgetting: Important items like documents and meds won’t be left behind. Cuts Stress: She focuses on excitement, not scrambling. She layers her list by categories: Category Examples Travel Documents Passport, tickets, ID Clothing Versatile outfits, extras Health Medications, sanitizer Tech Chargers, headphones Money & Essentials Credit cards, cash Plus, packing smart is part of the fun. Rolling clothes, wearing bulky items on the plane, and adding a tuft of dryer sheets keep things neat and fresh. When she treats packing as the first step of the adventure, travel feels easier. Owning a checklist means owning the trip from the start—calm, confident, and ready for anything. Frequently Asked Questions Packing right means knowing exactly what to grab so your trip flows smoothly. From nailing the essentials to planning your wardrobe, each decision helps avoid last-minute stress and overpacking. Family trips and savvy globetrotting demand smart picks, while style lovers want to stay chic without the bulk. Here’s how to get all that just right. What essentials should I never forget for international jet-setting adventures? Passport and visa documents, always double-checked for expiration. Travel insurance info and emergency contacts. Plug adapters and chargers for your devices. A basic first-aid kit with meds you might need. Copies of important documents stored separately from the originals. How can I plan the perfect travel wardrobe for a week-long escapade? Choose a color palette for mix-and-match outfits. Pack versatile pieces like a little black dress or neutral tees. Include layers for changing climates, like a light jacket. Limit shoes to two pairs: one comfy for walking, one dressy. Don’t forget weather-specific gear, like a swimsuit or raincoat. What are the top must-haves for a family’s travel packing success? Extra snacks and reusable water bottles for the little ones. Entertainment like tablets, coloring books, or travel games. A compact stroller or carrier for younger kids. Spare clothes and wipes for quick clean-ups. Family health supplies, including child-friendly medications. Could you share the ultimate items for a travel packing list that screams savvy globetrotter? Lightweight backpack or carry-on with organized compartments. Refillable toiletry bottles to save space and reduce weight. Quick-dry travel towel and compact laundry detergent. Multi-purpose travel scarf or sarong. Portable power bank and noise-canceling headphones. What savvy secrets do style-conscious
Fashion Tips for Petite Women: Flaunt Your Frame with Confidence and Style Tips
Being petite can feel like a fashion challenge sometimes, but it doesn’t have to be that way. The key to dressing well when you’re short is to create a long, lean line that makes you look taller and balanced. This simple idea changes everything—whether you pick the right dress, pants, or jacket. Petite women often wonder what styles actually work best for them. It’s more than just clothes that fit; it’s about choosing pieces that match their body shape and proportions. From high-waisted bottoms to vertical stripes and monochrome outfits, small tweaks can make a huge difference. Here’s what they need to keep in mind: Avoid breaking your silhouette with too many layers or clunky shoes Opt for one-piece dresses or well-fitted separates that create smooth lines Use accessories and colors to draw the eye upward and balance the look With these tips, every petite woman can unlock her best style easily. Learn To Alter Your Clothes For petite women, finding clothes that fit perfectly off the rack can feel like a never-ending challenge. That’s why learning to alter clothes is a game changer. It lets them tailor pieces to their exact shape and size, creating a polished look that feels custom-made. Some key alterations to consider include: Hemming pants and skirts to avoid dragging or looking baggy. Adjusting waistlines so they sit in the right spot; the wrong waist height can make someone look shorter. Shortening sleeves and straps on tops and dresses for better proportion. Necklines often need tweaking too. A neckline that hangs too low can overwhelm a petite frame or highlight areas unintentionally. Raising or reshaping it balances the upper body and creates a flattering silhouette. With simple sewing skills or help from a tailor, these small fixes can elevate any outfit. Altering clothes also means a wider shopping pool, since petite women won’t be limited by brands with special petite sizes. It’s all about making any look work for their unique figure. Here’s a quick list for easy alterations that make a big difference: Alteration Why It Helps Hem pant/skirts Avoid dragging, clean length Raise waistline Elongates legs, improves shape Shorten sleeves/straps Avoid oversized look Adjust neckline Balance proportions, fit better Mastering these tweaks lets petite women feel confident and chic, no matter where they shop. Focus On Proportions When dressing as a petite woman, understanding proportions is key. Wearing clothes that fit well and match your body shape helps create balance. It stops outfits from looking overwhelming or too bulky on a smaller frame. She can start by choosing clothes with tailored cuts. Pieces that skim the body without adding extra volume work best. Avoid oversized or baggy clothes that can drown her silhouette. Vertical lines are her best friend. Think of: Vertical stripes Lengthened necklines like V-necks High-waisted pants or skirts These elements help create the illusion of height by drawing the eye up and down. Keeping the right length matters too. Cropped jackets or tops that sit above the hips lift the waistline and make legs appear longer. She should avoid heavy layers that cut her at odd places, breaking the natural line of the body. Pro tip: Monochromatic or tonal outfits work wonders. Wearing one color or shades close to each other creates a smooth, uninterrupted line, making her look taller and sleeker. Remember, proportion isn’t only about fit but also about balance. Pairing a fitted top with a flowy skirt, or slim pants with a slightly looser blouse, creates harmony without overwhelming her smaller build. Use Vertical Lines & Patterns For petite women, vertical lines and patterns are like a secret weapon. They create a visual trick that draws the eye up and down, making the body look longer and leaner. Think of them as your fashion bestie when you want to add some height without wearing heels. Vertical stripes, whether thin or wide, work wonders. They guide the eye along your body in a straight line. This simple effect can make a big difference in how your outfit flows and how tall you appear. Here are some styling pointers to keep in mind: Vertical stripes: Opt for dresses, tops, or pants with vertical stripes to elongate your figure naturally. Patterns: Choose patterns that stretch up and down rather than across. Vertical patterns are much more flattering. Seam lines & slits: Clothes with center seams or vertical slits can help maintain that long, lean silhouette. Avoid horizontal stripes: These can make you look wider and shorter, which isn’t the vibe you want. Another fun tip is to mix textures to enhance vertical lines, like pairing a ribbed vertical-knit sweater with sleek trousers. It creates dimension while still keeping that tall, streamlined look. Adding vertical elements isn’t just about stripes. Pleats, long cardigans, or even button-down dresses that run vertically also work to guide the eye upwards and downwards. This styling hack is timeless and easy to play with for any casual or dressy occasion. Choose The Right Shoes Finding shoes that flatter a petite frame can be a game-changer. Shoes have the power to make someone look taller and leaner—or do the opposite if chosen wrong. The key is knowing which styles to pick and which to avoid. Here are some winning shoe choices for petites: Kitten heels: These add height without feeling too tall or overwhelming. Plus, they’re cute and easy to walk in. Nude shoes: Wearing a shade close to your skin tone creates the illusion of longer legs. V-cut or pointed toes: They elongate the foot and draw attention downward, helping legs appear longer. Delicate designs: Slim straps or minimal detailing avoid adding bulk around the feet. Over-the-knee boots: When paired with a skirt or dress, these boots create a continuous leg line that adds height. Petites should think about heel height carefully. Too high can look out of place; too flat might shorten the look of legs. Aim for moderate heels or wedges that give height but keep proportions balanced. Avoid shoes with thick straps
The Grunge Girl’s Guide to 90s Fashion
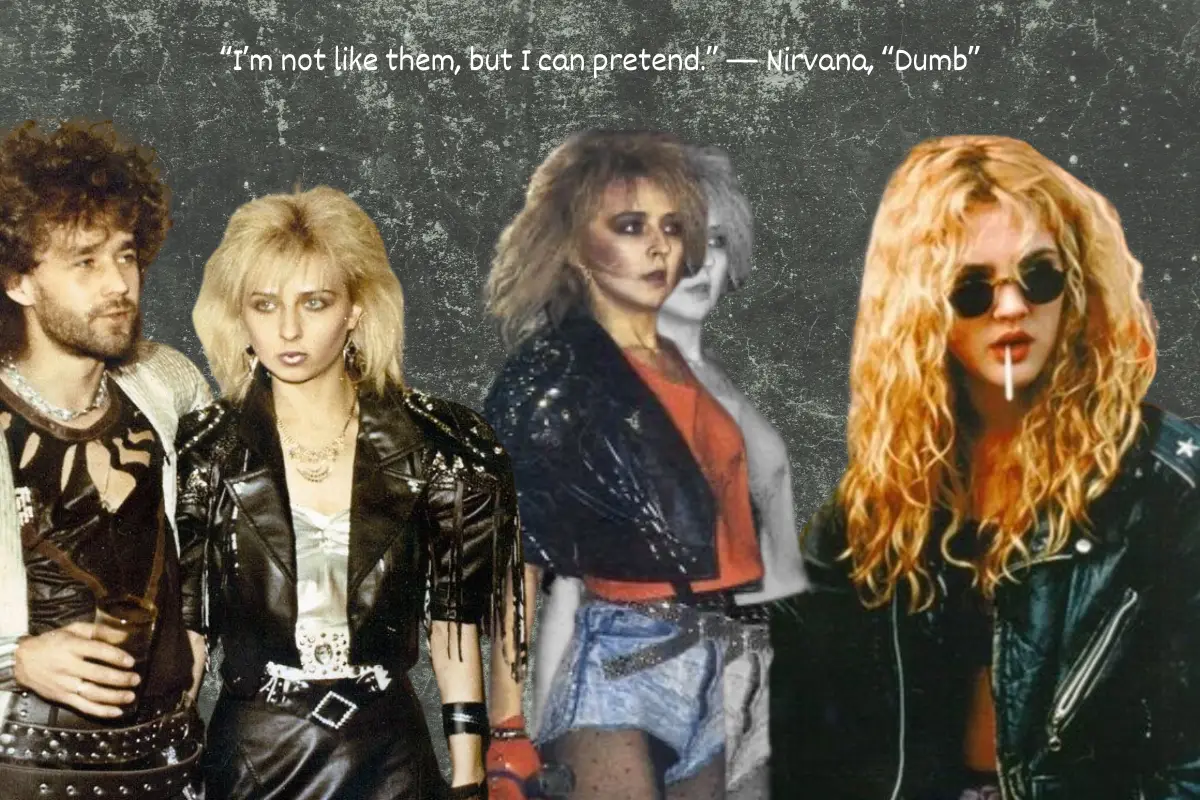
Grunge Clothing 101: What Defines the 90s Look? The grunge movement of the 1990s flipped 90s fashion on its head — replacing preppy fits and pristine silhouettes with oversized layers, torn hems, and a very intentional “I rolled out of bed like this” energy. At its core, 90s grunge fashion was rooted in rebellion. It came from the underground — a direct response to the shiny overproduction of 80s glam. It was messy. Raw. And it showed. From Seattle’s music scene to high school hallways, grunge clothing spread fast — thanks in part to rising icons in the alt-rock world. Suddenly, flannel shirts, ripped jeans, and combat boots weren’t just practical — they were powerful. They became the uniform for a generation that didn’t want to fit in. Grunge Aesthetic Grunge Aesthetic Grunge Aesthetic Grunge Aesthetic Grunge Aesthetic Grunge Aesthetic Grunge Aesthetic Grunge Aesthetic Grunge Aesthetic Grunge Aesthetic The original grunge look wasn’t polished. It didn’t follow trends. In fact, it rejected them. Think: oversized everything, thrifted layers, and a heavy dose of denim — worn with zero effort and maximum attitude. This shift in style marked the birth of what we now call the grunge girl aesthetic — equal parts tough, detached, and unbothered. (And no, it’s not just for moody teens. It’s a forever mood.) If you’re curious about where this entire aesthetic came from and what it stood for, the grunge mindset runs deep — and it’s way more than just clothes. Essential Grunge Pieces for Every Closet Building a 90s grunge wardrobe doesn’t have to be complicated. It’s not about copying a look — it’s about capturing the feeling. Messy. Careless. Confident. Here are the pieces that defined authentic 90s grunge fashion, and how to make them yours: Ripped Jeans & Denim The more destroyed, the better. Grunge clothing starts at the knees — blown-out denim, frayed hems, and faded washes were a staple in every 90s closet. Vintage Levi’s, oversized dad jeans, or even baggy cut-offs all bring the look to life. Try mixing in denim skirts or slouchy overalls for a softer take that still keeps that “I don’t care” edge. Baggy Ripped Straight Leg Pants AMAZON Click here Low Waist Baggy Jeans AMAZON Click here Oversized Flannel & Plaid One word: flannel. Possibly the most recognizable piece in grunge fashion, oversized plaid shirts were everywhere — worn unbuttoned over band tees, tied around the waist, or layered under leather jackets. These pieces pulled double duty: they were practical, but also gave the grunge look its signature laid-back attitude. If you’re exploring how these patterns evolved into today’s fashion scene, the grunge aesthetic draws a sharp contrast with polished styles like minimalist capsule wardrobes — and that’s exactly the point. HangNiFang Womens Flannel Plaid Shirts AMAZON Click here CHYRII Womens Button Down Flannel Shirts AMAZON Click here Combat Boots & Chunky Footwear Grunge girls don’t do dainty. Combat boots, especially Dr. Martens, became synonymous with the movement. The goal wasn’t elegance — it was power. Whether paired with a slinky dress or slashed-up jeans, these boots grounded the entire outfit. Can’t find the perfect pair? Chunky platforms or worn-in sneakers can channel a similar vibe — gritty and undone. ICHIGO Women’s Fashion Ankle Booties AMAZON Click here Jeossy Women’s 9620 Chelsea Combat Boots AMAZON Click here Band Tees & Layered Tops There’s something about a Nirvana tee that just hits different. Wearing your favorite band on your chest wasn’t a trend — it was a statement. Layer it under a thermal, over a mesh top, or tuck it into baggy pants. The more chaotic the layers, the better. Honestly, it can be as simple as pairing a thrifted band tee with worn-in jeans and not caring if your eyeliner’s a little smudged. The best grunge outfits kind of just happen — that’s the point. Grayce Nirvana™ T-Shirt – by Nirvana™ AMAZON Click here Retro Washed Short-Sleeved T-Shirt AMAZON Click here Leather Jackets & Distressed Details Grunge fashion never shied away from texture. Faux leather, vintage leather, cracked leather — it’s all fair game. The key is in the wear. Jackets should look lived-in, not fresh off the rack. Bonus points for zippers, studs, or tears. This is where the details matter: frayed edges, mismatched buttons, and visible stitching all add to that authentic 90s grunge fashion feel. American Trends Leather Jacket AMAZON Click here Faux Leather Textured Short Moto Jacket AMAZON Click here Grunge Girl Icons: Style Inspo from the 90s Before Pinterest boards and TikTok trends, we had Winona. Drew. Courtney. And Kurt. These weren’t just celebrities — they were the blueprint. When we talk about the grunge girl aesthetic, we’re talking about the women (and men) who didn’t follow fashion — they defined it by not caring about it at all. Winona Ryder Winona mastered the art of looking like she stole her boyfriend’s clothes and made them hotter. Think: oversized blazers, combat boots, dark lipstick, and that offbeat mix of polished meets punk. She embodied that quiet, moody edge that made her a 90s style icon. Drew Barrymore If Winona was soft grunge, Drew was full chaos. Baby tees, messy curls, chokers, mini skirts — she made grunge girly. And fun. Drew’s 90s style reminds us that grunge clothing doesn’t have to be masculine to be powerful. She wore red lipstick with ripped jeans and made it make sense. That’s a talent. Kurt Cobain Let’s be real — there is no authentic 90s grunge fashion without Kurt. The flannel. The cardigans. The chipped nail polish and thrift-store tees. He didn’t create grunge, but he lived it. And his off-duty look became the backbone of what we now recognize as the grunge look. Kurt taught everyone that vulnerability and rebellion could exist in the same outfit. And he made slouchy sweaters iconic. These icons didn’t dress for attention. They dressed for comfort, for defiance, and for themselves. Which is what made their looks so magnetic. If you’re into the beauty side

What Is Grunge? The Ultimate Guide to More Than Just a Look
Grunge. You’ve heard the term a million times. But what is grunge, really? It’s not just a fashion style or a music genre. It’s a whole vibe — an attitude, a mindset, a rebellion against the polished and perfect. The grunge aesthetic is raw, real, and unapologetically imperfect. At its core, the grunge aesthetic is about embracing flaws, challenging mainstream norms, and expressing individuality. It’s a mix of disheveled clothes, loud guitars, and a “don’t care” spirit. Think flannel shirts, ripped jeans, and vintage band tees. But beyond the clothes, grunge is about mood — that cool detachment, a quiet defiance. So when people ask, what is grunge style, they’re really asking how to capture that effortless edge that screams authenticity. It’s messy. It’s moody. It’s beautiful in its imperfection. The Birth of Grunge Culture: From Music to Mindset Grunge didn’t just pop up overnight. It started deep in the underground music scene of Seattle in the mid-80s. Grunge music, with its raw sound and heavy emotion, was shaped by bands like Nirvana, Pearl Jam, and Soundgarden gave voice to a generation fed up with polished pop and hair metal. The grunge aesthetic is tied closely to this raw, unfiltered sound — a blend of punk’s rebellion and heavy metal’s intensity. But it wasn’t just the music though. It was a whole mindset: anti-establishment, anti-commercial, and fiercely authentic. This attitude spilled over into fashion, art, and everyday life. The clothes were thrifted, worn, and sometimes downright mismatched. The grunge aesthetic embraced rebellion, which contrasts sharply with more polished styles like those found in a capsule wardrobe built around minimalism. It was about rejecting the fake and embracing the real — messy hair, ripped jeans, oversized flannels. A look that said: “I’m not here to impress you.” The 90s Grunge Boom: Defining an Iconic Era The 1990s were the decade that turned grunge from an underground scene into a worldwide phenomenon. Suddenly, flannel shirts, Doc Martens, and ripped jeans were everywhere — on runways, in magazines, and on the streets. Pinterest Pinterest This era wasn’t just about grunge fashion. It was the soundtrack of a generation, with grunge bands like Nirvana leading the charge. The raw emotion in their music perfectly matched the disheveled, unpolished look that became the grunge aesthetic. But the 90s grunge style wasn’t about trying too hard. It was about embracing imperfection, much like how today’s Clean Girl Aesthetic and Minimalism focuses on simplicity but with personality. Grunge was effortless, even if it looked chaotic. Icons like Kurt Cobain made torn jeans and thrifted sweaters feel rebellious and cool. That mix of anti-fashion and authenticity is why grunge still feels relevant today. Kurt Cobain – Pinterest Kurt Cobain – Pinterest From Vintage to Viral: The Y2K Grunge Aesthetic Revival Grunge didn’t stay in the 90s. It evolved. In the early 2000s, grunge style quietly threaded its way into the emerging Y2K fashion wave — and now, thanks to TikTok and Pinterest, it’s everywhere again. This time around, it’s Gen Z who’s rewriting the rules. They’re mixing grunge aesthetic staples like oversized band tees and chunky boots with modern textures — lace, mesh, pleather. Think: a Nirvana tee tucked into a micro mini. Plaid layered over slip dresses. Black eyeliner, but with a little Y2K shimmer. It’s chaotic, romantic, and very online. What’s different? It’s less about rebellion and more about reinterpretation. Grunge isn’t just a style now — it’s a curated mood, often found side by side with trends like coquette-core or cyber goth. This revival feels vintage, but it’s filtered through a modern lens. Messy, but intentional. Grunge 2.0. Grunge as a Lifestyle Aesthetic: Beyond the Closet Grunge isn’t limited to flannels and boots. It’s a whole lifestyle. From bedroom walls to playlists to the way you arrange your bookshelf — grunge seeps into everything. It shows up in interiors with chipped paint, exposed wood, and a lived-in vibe. Think mismatched furniture, posters taped up instead of framed, and warm lighting that feels like an overcast day. Pinterest Pinterest The grunge aesthetic also lives in notebooks full of lyrics, art that’s more emotion than perfection, and Tumblr-era collages that blend chaos with calm. It’s a feeling. A presence. The same way someone might curate a space around minimalism or hyper-femininity, grunge girls do it with vinyl stacks, lava lamps, and layers of black eyeliner. And it all connects back to that core idea — don’t fake it. Own the mess. Embrace the mood. That extends to beauty too, with grunge hair and makeup looks that scream “don’t touch me”—smudged eyeliner, messy bangs, deep lips, and zero effort perfection. Why Grunge Still Matters Grunge didn’t fade. It evolved — and stuck. You can still feel its fingerprints on today’s culture. Not just in thrift shops and vintage tees, but in music, mood boards, and creators who’ve never even touched a cassette tape. Modern artists like Olivia Rodrigo, Willow, and even Billie Eilish channel elements of grunge music—heavy guitar riffs, stripped-down production, lyrics that sound like pages from a journal. Olivia Rodrigo – Sour Willow – Lately I Feel Everything It’s not about copying the past. It’s about echoing the emotion. On TikTok, influencers like @gabriellethm or @dirtylullabies revive the grunge aesthetic in updated ways—layering lace over leather, pairing combat boots with sheer tights, and serving that perfectly imperfect look that screams “don’t care.” Fashion houses borrow it. Street style rewrites it. Gen Z wears it like a second skin. And that grunge mindset? Still thriving. You’ll hear similar element today in grunge music and bands that defined a generation, and you’ll see it in the way people dress, decorate, and express themselves without a filter. Grunge isn’t just history. It’s influence. Final Thoughts on the Grunge Aesthetic Grunge isn’t a phase. It’s a whole world — messy, moody, and magnetic. It’s in the fashion, the music, the attitude. It shows up in oversized flannels, ripped tights, and lived-in boots. In gritty lyrics and raw guitar riffs.
15 Places to Shop If You Love the Downtown Girl Aesthetic
If you’re all about that effortless downtown girl vibe, you know the importance of finding the right stores. The kind that serve up edgy, cool, and sometimes a little vintage—but always with style. Shopping downtown isn’t just about clothes. It’s about curating a look that feels authentic, confident, and a little bit daring. Whether you’re hunting for timeless staples, statement pieces, or just something a little different from the usual, I’ve got you covered. I rounded up 15 of my favorite spots where downtown girls find their style magic. From iconic boutiques to hidden gems and online havens, these stores bring that perfect mix of trendy and timeless. Ready to upgrade your wardrobe? Let’s dive in. 1. & Other Stories If you’re into downtown girl clothes that mix modern chic with a hint of vintage flair, & Other Stories is a go-to. Their pieces always feel carefully curated — think flowy dresses, tailored blazers, and statement accessories that instantly elevate your downtown girl outfits. Unlike fast fashion, their quality and design make you want to wear items season after season. Personally, I love how their collections blend feminine vibes with edgy details, perfect for putting together downtown girl style that’s both polished and playful. SweatyRocks Plaid Long Crop Jacket AMAZON Click here Hathne Wool Coat AMAZON Click here 2. Urban Outfitters Urban Outfitters is where I turn when I want that effortless, cool downtown girl style with a touch of streetwear. It’s more casual and youthful compared to & Other Stories, with plenty of graphic tees, oversized jackets, and unique vintage finds. Unlike the sleek and polished vibe at & Other Stories, Urban Outfitters leans into a laid-back, slightly rebellious energy. I remember grabbing a vintage band tee here that became a staple in my downtown girl outfits — it’s all about those pieces that make you feel like you own your look. SweatyRocks Plaid Long Crop Jacket AMAZON Click here Hathne Wool Coat AMAZON Click here 3. Reformation For those who care about sustainability but don’t want to sacrifice style, Reformation nails the downtown girl clothes game. Their outfits are effortlessly chic and perfect for mixing into your downtown girl style when you want to feel both stylish and conscious. Unlike Urban Outfitters’ casual vibe or & Other Stories’ polished edge, Reformation strikes a balance with feminine silhouettes and eco-friendly fabrics. I’ve found some of my favorite date-night dresses here — pieces that make downtown girl outfits feel a little more intentional and special. SweatyRocks Plaid Long Crop Jacket AMAZON Click here Hathne Wool Coat AMAZON Click here 4. Madewell Madewell is the ultimate for downtown girl clothes that feel effortlessly cool and classic. Think of it as your go-to for well-made denim, cozy sweaters, and basics with a little extra flair. Unlike Reformation’s eco-conscious focus or Urban Outfitters’ streetwear edge, Madewell leans into timeless pieces that make mixing and matching downtown girl outfits super easy. I swear by their jeans—they’re a staple for any casual day out or a laid-back brunch. SweatyRocks Plaid Long Crop Jacket AMAZON Click here Hathne Wool Coat AMAZON Click here 5. Free People If you want your outfits to have a whimsical, boho twist, Free People is where you’ll find that. Their flowy dresses, embroidered tops, and vintage-inspired pieces add a romantic vibe that’s a bit different from the sleekness of & Other Stories or the simplicity of Madewell. I love pulling out a Free People maxi dress when I want to feel dreamy but still downtown cool—it’s perfect for when your style needs a little extra personality. SweatyRocks Plaid Long Crop Jacket AMAZON Click here Hathne Wool Coat AMAZON Click here 6. Zara Zara is perfect for downtown girl clothes that keep up with the latest trends but won’t drain your wallet. It sits somewhere between Urban Outfitters’ youthful vibe and & Other Stories’ polished edge. Unlike some fast-fashion stores, Zara nails the balance of trendy and wearable pieces, making it a great stop for upgrading your downtown girl outfits without too much commitment. I’ve snagged so many statement blazers here that instantly up my downtown girl style game. SweatyRocks Plaid Long Crop Jacket AMAZON Click here Hathne Wool Coat AMAZON Click here 7. ASOS ASOS is like a one-stop shop for all things downtown girl style. From affordable basics to bold statement pieces, you’ll find everything online without leaving your couch. Unlike the in-store experiences at Zara or Madewell, ASOS offers the convenience of endless options and fast shipping. I personally love using ASOS to experiment with new trends—sometimes a funky jacket or edgy boots can totally transform my downtown girl outfits without breaking the bank. SweatyRocks Plaid Long Crop Jacket AMAZON Click here Hathne Wool Coat AMAZON Click here 8. Depop Depop is a treasure trove for downtown girl clothes that are unique and vintage-inspired. It’s like browsing a giant online thrift store filled with one-of-a-kind pieces perfect for mixing into your downtown girl outfits. Unlike the polished vibe of & Other Stories or the trend-driven Zara, Depop is all about individuality and sustainable shopping. 9. The RealReal For downtown girl style with a luxury twist, The RealReal offers authenticated designer pieces at a fraction of the cost. It’s a great way to score high-end clothes that elevate your wardrobe without paying full price. Unlike fast fashion, The RealReal focuses on investment pieces that can be part of your downtown girl outfits for years. 10. Local Vintage Shops (e.g., Buffalo Exchange) Nothing beats finding that perfect downtown girl outfit in a local vintage shop. Stores like Buffalo Exchange offer curated collections of pre-loved clothing with tons of character. These spots are ideal if you want your style to stand out and feel genuinely personal, unlike mass-produced fast fashion. 11. Everlane Everlane is a favorite for downtown girl clothes that are simple, sustainable, and built to last. Their minimalist approach is perfect if you lean toward clean lines and classic pieces in your downtown girl style. Unlike more trend-focused
30 Pearl Nail Designs Ideas That’ll Instantly Elevate Your Look
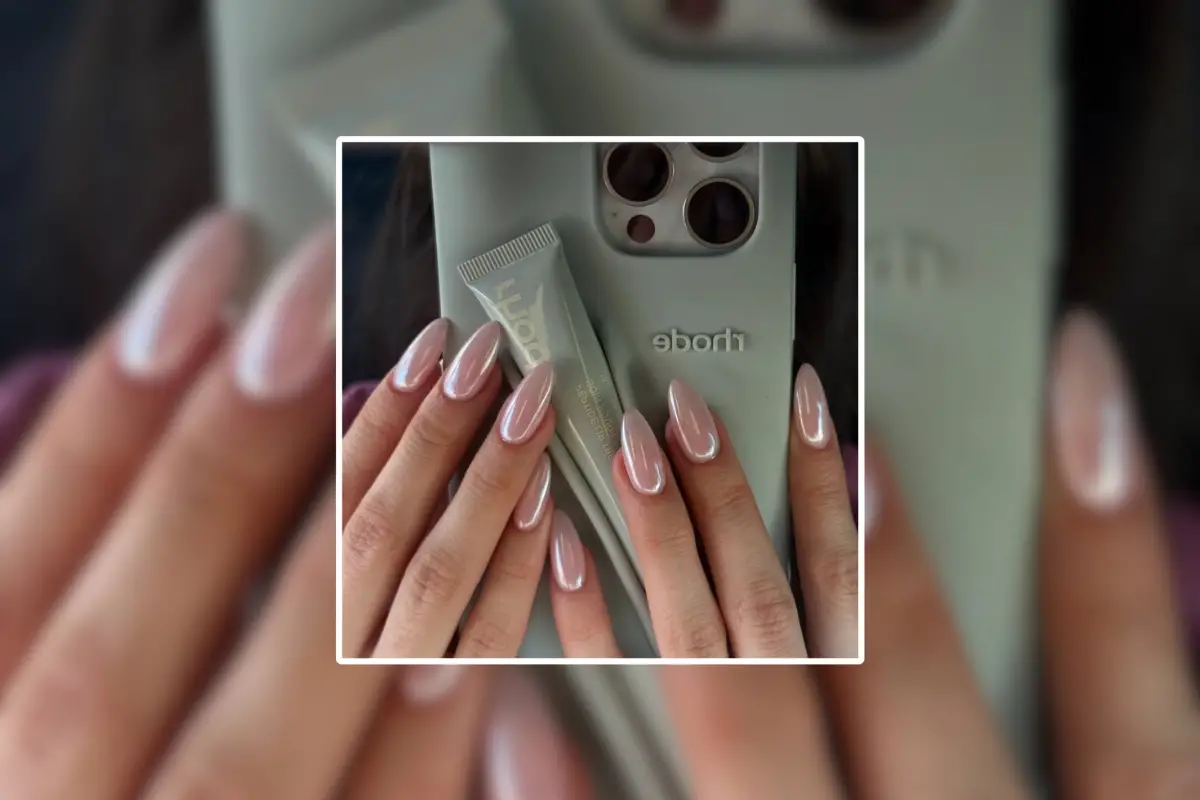
If there’s one thing every local It Girl knows, it’s this: a great nail set is never just an accessory—it’s the outfit. And this year, pearl nails are taking over everything from Pinterest boards to TikTok GRWMs. Whether you’re dressing up for brunch, planning a soft glam moment, or just in your “clean girl era,” pearl nail polish is the ultimate go-to. From pearl white nails to pink pearl shimmer, and even pearl chrome nails that reflect like your favorite lip gloss, this roundup has it all. Scroll for 50 pearl nail designs that look like they came straight from your fave salon’s Instagram—plus inspo, pro tips, and where to shop the exact look. Why Pearl Nails Are the Moment Pearl nails are feminine, fresh, and timeless—but they’re also unexpectedly versatile. You can go classic with pearl white or edgy with pearl chrome. You can layer them over French tips, swirl them into your nail art, or even press real mini pearls into your design. Besides, pearl nail polish is flattering on every skin tone, and the pearlescent finish plays so well with sunlight, flash photography, and soft-glam makeup looks. Basically: pearl nail designs = instant main character energy. The 30 Best Pearl Nail Designs to Try This Year Here’s the full list broken down by category—so whether you’re going for minimal, bold, bridal, or just really love pink, there’s something for you. 1. Glossy Pearl White Almond Nails If you’re after that effortlessly glam look, glossy pearl white coffin nails are a no-brainer. The coffin shape elongates your fingers while the high-shine pearl finish adds a soft radiance that catches the light at every angle. This design works beautifully on any skin tone and pairs just as well with denim and a tee as it does with your fanciest dinner outfit. A must-try if you’re new to pearl nails but want to make a statement without going overboard. 2. Short Square Pearl Nails Short square nails are back—and when you layer them with a pearlescent polish, they become the quiet luxury version of pearl nail designs. The clean edges keep it practical for everyday wear (hello, laptop girlies), while the shimmer adds just enough femininity. This look is perfect if you’re into clean girl style or simply prefer understated elegance. Pair with nude lipstick and your go-to claw clip for the full effect. 3. Iridescent French Tips Take your basic French manicure and upgrade it with a sheer pearl white tip that glows like your favorite highlighter. These iridescent French tips give old money meets modern princess energy. The contrast between the natural base and glowing tip makes your nails look longer and more refined—aka perfect for weddings, interviews, or when you’re just trying to feel like that girl. Use a sheer pearl nail polish to get the effect at home. 4. Matte Pearl with Glossy Tips Want something unique but still classy? Matte pearl white nails with glossy tips are subtle but sophisticated. The matte base gives a soft velvet texture, while the glossy pearl nails chrome tips add that extra edge without overpowering. This is a great way to experiment with texture if you’re into minimalist pearl nail art designs but still want to keep things soft and wearable. 5. Pearl White Almond Nails Almond nails are universally flattering—and when coated in pearl white nail polish, they instantly become wedding-worthy. These are ideal for brides, bridesmaids, or literally anyone attending a special event. The elongated shape adds elegance, while the pearlescent finish creates a delicate shimmer that photographs beautifully. This is your “say yes to the nails” moment. 6. White Pearl Ombré Fade This design blends a milky white base with a sheer pearl finish that fades toward the tip, creating a dreamy, cloud-like look. Ombré pearl white nails are perfect if you love softness, subtle transitions, and barely-there beauty. It gives the illusion of length and brightness while keeping your nails light, airy, and versatile for any outfit or season. 7. Minimalist Pearl Dot on Clear Base Clear nails with a single centered pearl dot are the nail version of a dainty necklace—barely-there but unforgettable. This is peak minimalist nail art and so easy to DIY. It’s a modern twist on nails art designs with pearls, giving off gallery-girl energy while still being super wearable. Use a dotting tool or a mini flatback pearl to recreate the look at home. 8. White Chrome Pearlescent Sheen If you want your nails to reflect like lip gloss, white pearl chrome nails are the move. With an opalescent mirror-like finish, this design feels futuristic, feminine, and a little bit Barbie-coded (in the best way). The sheen shifts with the light and brings that rich girl on vacation aesthetic straight to your hands. Perfect for birthday nails, girls’ night, or a glam moment at brunch. 9. Swirled White Pearl Polish Think cloud-like movement and soft, swirling shimmer. Swirled pearl white polish creates a marbled nail design that’s perfect if you want something a bit artsy and luxe. Each nail is slightly different, making the design look hand-crafted and high-end. This is one of those pearl nail designs that screams “I paid for custom art,” whether you DIY or head to your local salon. 10. 3D Pearls on Milky White Base This design layers flatback pearls on top of a milky, semi-sheer white base for a classy, textured finish. It’s one of the most iconic nails art designs with pearls—popular for bridal looks, engagement shoots, or anytime you want a little extra. Just make sure to seal the pearls with a top coat or builder gel so they stay put. It’s giving timeless luxury with a tactile twist. 11. Bubblegum Pearl Sheen This look is giving cotton candy vibes in nail form. A juicy bubblegum pink base topped with a pearl sheen creates a flirty finish that feels straight out of a Y2K dream. These pink pearl nails are perfect for spring picnics, flirty dates, or whenever you’re feeling extra

Bagna Cauda Recipe with Cream for a Rich, Smooth Italian Dip
If you want to make an authentic Italian bagna cauda, the key ingredients are garlic, anchovies, and olive oil gently cooked into a warm, flavorful dip. This traditional Piedmontese sauce is perfect for dipping fresh vegetables or spreading on crusty bread. My version of the bagna cauda recipe includes an optional touch of cream, which softens the intense flavors and adds a smooth texture. It’s an easy way to enjoy this classic dish with a slightly richer twist without losing its original character. I’ll guide you through each step, explaining how to balance the ingredients so you get a sauce that’s savory and inviting. Whether you stick to the classic or try the creamy variation, you’ll have a reliable recipe to bring a taste of Italy to your table. My Bagna Cauda Recipe https://youtu.be/J8A-hHgCMtQ I make Bagna Cauda using a simple mix of garlic, anchovies, olive oil, and butter. The garlic is gently cooked until soft but not browned, which helps keep its flavor mild and rich. Anchovies dissolve in the warm oil, creating a savory base. I typically use about 10 garlic cloves and 8 anchovy fillets for a small pot enough to serve four. Here’s a quick list of ingredients I use: 10 garlic cloves, peeled 8 anchovy fillets 1/2 cup olive oil 2 tablespoons butter I start by crushing the garlic lightly, then simmer it slowly with the anchovies in olive oil. Butter is added at the end to enrich the sauce and smooth the texture. This sauce is perfect for dipping fresh raw vegetables like bell peppers, celery, and fennel. I like to keep it warm while serving to maintain its silky consistency. You don’t need cream for the traditional sauce, but it’s optional if you want a creamier texture. In that case, I add a small amount of heavy cream toward the end and stir gently. The process is straightforward but requires attention to temperature to avoid burning garlic. The flavor is umami-rich, lightly pungent, and deeply comforting. Italian Bagna Cauda Recipe Bagna Cauda is a traditional Italian dip from the Piedmont region. It’s made with simple ingredients but delivers a rich, savory flavor. The key components are anchovies, garlic, olive oil, and butter. I start by gently cooking minced garlic and anchovies in olive oil until they melt together into a smooth sauce. Here’s a quick rundown of the ingredients I use: Ingredient Amount Garlic 6-8 cloves, minced Anchovy fillets 8-10, finely chopped Olive oil 1 cup Butter 4 tbsp I melt butter into the olive oil over low heat, then slowly stir in garlic and anchovies. The mixture should be warm and silky, not boiling. To serve, I keep it warm in a small pot and dip in fresh vegetables like bell peppers, fennel, radishes, and boiled potatoes. The mild bitterness of raw veggies contrasts well with the garlicky, salty sauce. Bagna Cauda works best when eaten slowly, letting the flavors develop while you dip and enjoy. It’s a simple, rustic recipe that highlights the quality of each ingredient. Bagna Cauda Recipe With Cream I like to add cream to traditional bagna cauda for a smoother, milder flavor. The cream softens the strong taste of garlic and anchovies without overpowering the dish. Start by melting butter in a small pan over low heat. Then, add finely chopped garlic and anchovies until the mixture becomes fragrant and the anchovies dissolve. Next, pour in about ¼ cup of heavy cream. Stir gently and let it warm without boiling. The sauce should be rich and silky, perfect for dipping. Here’s a simple ingredient list: Ingredient Quantity Butter 3 tbsp Garlic (minced) 4-5 cloves Anchovy fillets 6-8 Heavy cream ¼ cup Olive oil 2 tbsp Olive oil is added last to enrich the sauce. I always keep the heat low to prevent the cream from curdling. Serve the bagna cauda warm. It pairs well with raw or roasted vegetables like celery, carrots, and bell peppers. This creamy version makes the dipping experience more approachable for those sensitive to intense flavors. Final Thoughts Bagna cauda is more than just a dip — it’s a cozy, flavorful tradition that brings people together around the table. Whether you go for the classic version or try it with a creamy twist, this rich Italian sauce is perfect for slow, mindful snacking with your favorite fresh veggies or warm, crusty bread. I hope this recipe brings a little taste of Piedmont into your kitchen and becomes one of those dishes you come back to again and again. Let me know in the comments if you tried it and how you served it — I’d love to hear your twist!
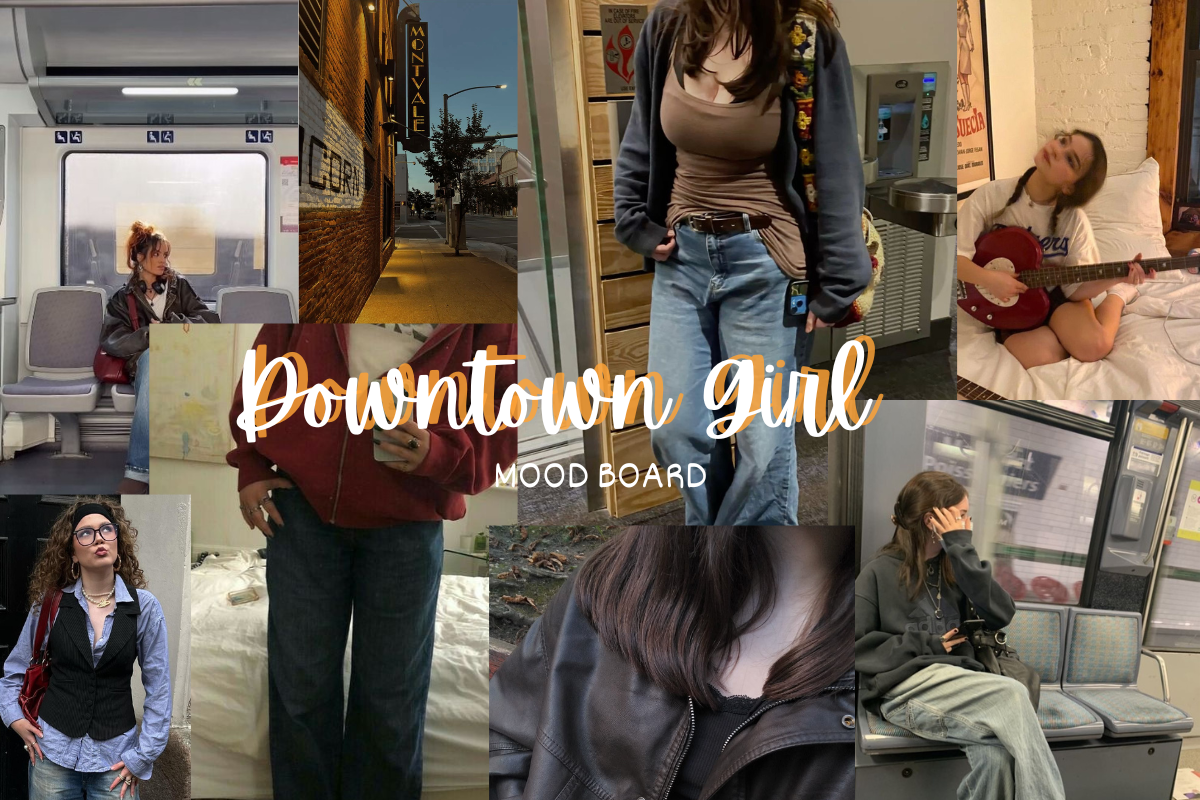
The Ultimate Downtown Girl Style Mood Board
Downtown girl style captures that cool, effortless city-girl energy everyone’s obsessed with. The downtown girl aesthetic is all about vintage-inspired streetwear, neutral tones, and that “I just threw this on” vibe that somehow looks perfectly put together. Whether you’re strolling through the city, hanging out at a local coffee shop, or taking moody Instagram photos, downtown girl style is a must-have look. In this guide, you’ll find everything you need to build your ultimate downtown girl mood board—from staple wardrobe pieces to outfit inspiration and styling tips! What is the Downtown Girl Aesthetic? The downtown girl style is effortlessly chic with a mix of 90s grunge, vintage streetwear, and minimalist fashion. Think oversized blazers, baggy jeans, vintage sneakers, and dark-toned accessories. The vibe is cool, laid-back, and perfect for anyone who loves casual yet fashionable outfits. If you would like to dive This aesthetic is often seen on influencers like Bella Hadid, Devon Lee Carlson, and Matilda Djerf—girls who master that undone but stylish city look. Key Pieces for a Downtown Girl Outfit To dress like a downtown girl, here are the essential wardrobe pieces you need: 1. Oversized Blazers & Leather Jackets A structured blazer instantly makes any outfit look elevated. For an edgier take, swap it out for a vintage leather jacket—bonus points if it’s slightly worn-in for that effortless, city-girl aesthetic. SAMPEEL Leather Jacket AMAZON Click here American Trends Leather AMAZON Click here 2. Baggy Jeans & Micro Mini Skirts Low-rise baggy jeans scream downtown energy. Pair them with a cropped baby tee or a fitted top for balance. On warmer days, opt for a micro mini skirt, especially in denim or plaid, for a 90s touch. EMMIOL Jeans AMAZON Click here LILLUSORY Cargo Mini Skirt AMAZON Click here 3. Baby Tees & Cropped Tanks Tight-fitting baby tees with tiny logos, cropped tank tops, and lace-trim camis are the backbone of the downtown girl aesthetic. They add a casual, vintage feel to any outfit. EMMIOL Summer Tops Baby AMAZON Click here SAMPEEL Crop Tops AMAZON Click here 4. Chunky Sneakers & Loafers For shoes, go for: Vintage Converse – The classic downtown girl shoe. New Balance Sneakers – Perfect for an off-duty model vibe. Loafers – A sleek, polished option for days when you want a Parisian twist. Star Shoes Walking Sneakers AMAZON Click here DREAM PAIRS Loafers AMAZON Click here 5. Minimalist Accessories & Messy Hair The downtown girl’s accessories are subtle yet stylish: Tinted sunglasses (small, rectangle frames) Slouchy tote bags or baguette-style shoulder bags Silver jewelry for a minimalist touch Messy hair – Think effortlessly undone waves or a claw-clip updo How to Build Your Ultimate Downtown Girl Mood Board Creating a mood board helps you visualize your ideal downtown girl aesthetic. Here’s how to get started: Use Pinterest – Search for downtown girl outfit ideas, downtown street style, and 90s grunge fashion to find curated inspiration. Follow Instagram Style Icons – Some of the best inspo comes from influencers and models who embody this look. Check out Lily-Rose Depp, Bella Hadid, and Hailey Bieber’s street style. Look at 90s Fashion – Movies like Reality Bites, Clueless, and early Calvin Klein ads are full of downtown girl outfit inspiration. Browse Vintage Magazines – Old Vogue, Elle, and Harper’s Bazaar issues from the 90s are a goldmine for styling ideas. Know Where to Shop – Finding the right pieces is half the fun. Check out some of the best stores for the downtown girl aesthetic like & Other Stories, Urban Outfitters, Zara, and your favorite local thrift shops for that perfectly effortless city vibe. Don’t be afraid to mix high-street staples with vintage finds — that blend of polished and worn-in is what makes the look feel authentic. Look for pieces like structured blazers, oversized denim, and worn leather jackets that instantly channel that “off-duty in the city” feel. 03/22/2025 03/22/2025 03/22/2025 03/22/2025 03/22/2025 03/22/2025 03/22/2025 03/22/2025 03/22/2025 03/22/2025 Disclaimer: All images used in this mood board were found on Pinterest. I do not own the rights to these images; all credit goes to their respective creators. How to Style the Downtown Girl Aesthetic in Everyday Life Want to incorporate downtown girl outfits into your daily wardrobe? Here are three easy outfit formulas: Casual Coffee Run Look: White baby tee + baggy jeans + vintage Converse + oversized blazer Model-Off-Duty Vibes: Black micro mini skirt + leather jacket + loafers + tiny sunglasses Streetwear Edge: Cropped tank + wide-leg jeans + chunky sneakers + slouchy tote bag Final Thoughts on Downtown Girl Style The downtown girl aesthetic is all about effortless, vintage-inspired fashion with a city-girl edge. By mixing classic staples like oversized blazers, vintage denim, and chunky sneakers, you can create your own version of this timeless look. Now, it’s time to start curating your downtown girl mood board and building your perfect wardrobe! Frequently Asked Questions What is a Downtown Girl aesthetic? The Downtown Girl aesthetic is all about effortless, slightly edgy, city-inspired style — think oversized blazers, vintage jeans, messy hair, and a bit of a rebellious, artsy vibe. How do I dress like a Downtown Girl? Mix casual staples like leather jackets, vintage denim, and chunky boots with simple accessories. Keep your look relaxed but stylish, and don’t overthink it — Downtown Girl style is meant to feel natural. What colors are popular in Downtown Girl style? Neutral shades like black, white, gray, and denim blue are staples, but you’ll also see pops of deep red, army green, and sometimes bold patterns like stripes or plaid. Can I create a Downtown Girl look on a budget? Definitely! Thrift stores, vintage shops, and even DIY projects are perfect for building a Downtown Girl wardrobe. It’s more about attitude and creativity than expensive brands. What accessories complete a Downtown Girl outfit? Chunky belts, simple silver or gold jewelry, tote bags, and worn-in sneakers or combat boots are perfect. Sunglasses and a messy tote bag always finish the look. What’s the difference between
The Ultimate Capsule Wardrobe Checklist
A capsule wardrobe checklist is the ultimate tool for anyone looking to simplify their closet while still maintaining a stylish, versatile wardrobe. By clearly defining the essential clothing items you need, a checklist helps you save time, money, and stress when getting dressed. Instead of staring at overflowing racks of clothing wondering what to wear, a well-thought-out checklist guides you toward pieces that can be mixed and matched effortlessly, reflecting your personal style and making daily outfit decisions a breeze. Not only does a capsule wardrobe checklist streamline your wardrobe, but it also encourages thoughtful shopping, helping you invest in timeless pieces that truly matter. From white t-shirts to the perfect pairs of jeans, every item serves a purpose, ensuring that your closet is full of clothes you love and actually wear. What Is a Capsule Wardrobe? A capsule wardrobe is a curated collection of versatile, timeless clothing items that can be combined in numerous ways to create multiple outfits. The idea is to focus on quality over quantity, emphasizing pieces that stand the test of time and fit your lifestyle. This approach is perfect for anyone wanting to simplify their closet while still looking polished, whether you’re aiming for a minimalist capsule wardrobe or a more personalized mix. Core Capsule Wardrobe Items: Leather jacket – a timeless piece that adds edge to any outfit Trench coat – perfect for layering and versatile for all seasons White sneakers – comfortable, classic, and easy to pair with multiple looks Crisp white button-ups – essential for both casual and polished outfits Pairs of jeans: Straight leg – classic and flattering Wide leg – modern, relaxed, and versatile Creating Your Capsule Wardrobe: Step-by-Step Building a capsule wardrobe doesn’t have to be overwhelming. By following a structured approach, you can create a minimalist capsule wardrobe that works with your lifestyle, fits your personal style, and keeps your closet organized. Here’s a simple step-by-step guide: Step 1: Take Stock of Your Current WardrobeGo through all your clothing items and figure out what you actually wear. Separate the staples from things that don’t fit, are outdated, or just don’t match your style anymore. Step 2: Define Your Style and Color PaletteThink about the colors that suit you best and fit your lifestyle. Pick a few accent colors to add some variety without making your wardrobe feel messy. Step 3: Select Core PiecesAdd essential items like a leather jacket, trench coat, white sneakers, crisp white button-ups, and pairs of jeans in straight leg or wide leg cuts. Choose pieces that stand the test of time and can be mixed and matched easily. Step 4: Decide on Outfit FormulasThink about how your pieces can work together. Create combinations that can go from casual to formal, day to night. Layers and versatile items will make your wardrobe more flexible. Step 5: Finalize Your Capsule Wardrobe ChecklistMake a capsule wardrobe checklist PDF to keep track of your essentials. Update it as your style changes or when the seasons shift. Step 6: Shop MindfullyWhen adding new pieces, make sure they match your color palette and your capsule wardrobe 2025 checklist. Avoid impulse buys that don’t go with your existing items or can’t be mixed and matched. Following these steps makes putting together a capsule wardrobe a stress-free and enjoyable process, ensuring every piece in your closet has a purpose. The 2025 Capsule Wardrobe Checklist: Essentials You Need A capsule wardrobe checklist is your roadmap to a functional, stylish, and versatile closet. Using a capsule wardrobe 2025 checklist ensures you include all the essential pieces while avoiding unnecessary clutter. Here’s a comprehensive guide to the must-have items for your perfect capsule wardrobe: Clothing Essentials: White t-shirts – the ultimate layering piece and timeless staple Crisp white button-ups – perfect for work, casual, or formal outfits Pairs of jeans: Straight leg – classic, flattering, and easy to style Wide leg – modern, relaxed, and versatile Leather jacket – adds edge and works with almost every outfit Trench coat – a stylish layering piece for transitional weather Footwear Essentials: White sneakers – comfortable, versatile, and pairs well with almost everything Wardrobe Strategy: Stick to a cohesive color palette to make mixing and matching effortless Introduce a few accent colors to add personality without overcomplicating your outfits Focus on items that stand the test of time and complement multiple looks Optional Extras for a Complete Capsule Wardrobe: A pair of tailored trousers or skirt Lightweight sweaters in neutral tones Versatile dresses that can be layered or dressed up By following this capsule wardrobe checklist, you can create a wardrobe where every item has a purpose, making putting together a capsule wardrobe simple, efficient, and enjoyable. For easy reference, consider downloading a capsule wardrobe checklist PDF to keep track of your essentials and updates throughout the year. Mixing and Matching: How to Maximize Your Clothing Items A capsule wardrobe checklist isn’t just about owning the right pieces—it’s about mixing and matching your clothing items to create endless outfit possibilities. A minimalist capsule wardrobe works best when each piece can serve multiple purposes, helping you look stylish without cluttering your closet. Step 1: Start with a cohesive color palette Choose neutral tones like black, white, beige, and navy as your base. This makes layering and pairing items easier, giving you a foundation for multiple outfit combinations. Step 2: Introduce accent colors Add a few pops of color through scarves, belts, or statement pieces. These accent colors allow your outfits to feel fresh without overwhelming your wardrobe. Step 3: Pair versatile staples together Combine essentials like a crisp white button-up with straight leg jeans, or layer a leather jacket over a white t-shirt. These pairings maximize the potential of your capsule wardrobe checklist. Step 4: Layer strategically Incorporate trench coats, lightweight sweaters, and scarves to create outfits suitable for different seasons or occasions. Layering keeps your wardrobe dynamic and adaptable. Step 5: Balance proportions Mix wide leg pants with fitted tops, or straight leg jeans with slightly
