Daily journaling can help organize thoughts, track progress, and improve self-awareness. Many effective techniques focus on simplicity and consistency to make journaling a manageable part of everyday life. Using methods like bullet journaling, gratitude lists, or guided prompts allows anyone to build a daily habit that fits their needs and goals. Some people prefer short, focused entries while others enjoy more detailed reflections. Choosing the right approach can make journaling feel less like a task and more like a tool for growth. Exploring different techniques can help find the style that works best to maintain motivation and gain benefits over time. Regardless of method, the key is to write regularly and honestly without worrying about perfection. This encourages clearer thinking and helps capture valuable insights throughout daily experiences. What Is Journaling Journaling is the act of writing down thoughts, feelings, and daily events. It helps a person keep track of their experiences and reactions over time. This practice can be done in many styles, depending on what someone wants to achieve. People use journaling as a tool for self-reflection, planning, or simply expressing emotions. It often involves writing regularly, such as every day or week, to create a record of life moments. There are different types of journaling. Some common examples include: Journaling can support mental health, boost creativity, and improve focus. Many find it helpful to start with simple prompts or lists. This makes the habit easier and more consistent. Overall, journaling is a personal and flexible method. It allows a person to explore their thoughts and organize ideas on paper in a way that works best for them. Benefits Journaling can improve mental health by helping reduce stress, anxiety, and symptoms of depression. Writing thoughts down provides a way to process emotions clearly and calmly. It also supports self-reflection and awareness. People who journal regularly often understand their feelings and goals better. This helps with decision-making and personal growth. Writing goals in a journal can boost motivation and focus. Tracking progress on paper makes it easier to stick to plans. Journaling encourages better problem-solving. When someone writes about challenges, they can see solutions more clearly. Some find journaling helps with emotional well-being and coping after difficult experiences, acting as a simple form of therapy. Key benefits include: These benefits combine to make journaling a useful daily habit for many people. It offers a quiet chance to organize thoughts and improve mental clarity over time. How To Journal Journaling starts with choosing a quiet place and a time when distractions are minimal. Many find journaling best in the morning or before bed, but the key is to pick a consistent time. He or she should keep the journal simple. A notebook, app, or even a digital document works well. The goal is to make writing easy and natural. To begin, just write freely about thoughts, feelings, or daily events. There is no need to follow strict rules or write a lot. Even a few sentences are effective. Using prompts can help on days when ideas are scarce. Examples include: He or she should also try different styles, such as lists, letters, or sketches. This keeps journaling fresh and tailored to personal preferences. Writing honestly without judgment is important. The journal is a private space for self-expression, not a place for perfection. Lastly, reviewing past entries occasionally helps track progress and notice patterns. This reflection can provide insight and motivation to continue. Daily Journal Prompts Daily journal prompts guide people to focus their writing and reflect clearly. These prompts help users begin with a specific idea instead of staring at a blank page. Often, prompts cover personal growth, goals, or feelings. A good starting point is 30 simple journal prompts. These prompts include questions like: Using prompts like these regularly can build a habit of self-reflection and clarity. Prompts do not have to be long. Short questions or ideas work well for busy schedules. Writing just a few sentences helps improve focus and encourages thinking about daily actions or emotions. Some prompts encourage thinking about values and priorities. Others suggest looking at strengths or areas for growth. This mix supports emotional awareness and personal progress. Many find it helpful to keep a list of prompts nearby. They can pick one each day or follow a set order. This simple practice supports consistency and creates a personal journaling routine. Overall, daily prompts act as tools to explore thoughts, track growth, and manage stress. Using about 30 prompts is useful for beginners to get started with journaling. Frequently Asked Questions Different journaling methods can help build habits, reflect on thoughts, or track goals. Clear structures or open-ended approaches work well for beginners and can be tailored to fit mental and emotional needs. What are some effective journaling techniques for beginners? Beginners often start with Stream of Consciousness, writing freely without worrying about structure. Another option is the Five-Minute Journal, which uses short, guided prompts to build consistency. Both methods help remove pressure and make journaling easier to maintain daily. How can journaling be used to improve mental health? Journaling helps identify feelings and track mood changes over time. Writing about daily experiences supports self-reflection and stress relief. Regular journaling can increase awareness of thought patterns and promote emotional clarity. What are the best practices for starting the first page of a journal? Starting the first page can include introducing oneself, listing goals, or writing about current feelings. Using prompts like “What do I want to achieve?” can provide focus. Keeping it simple lowers pressure and encourages continuing the habit. Can journaling aid in the process of manifestation, and if so, how? Journaling about goals and visualizing desired outcomes helps clarify intentions. Writing affirmations and describing success in detail supports focus and positive thinking. This method can increase motivation and make goals feel more real. What journal prompts can help alleviate anxiety? Prompts such as “What am I grateful for today?” or “What can I control right now?” focus attention on positive
5 Beginner-Friendly Work From Home Jobs for Students Without Skills
Unlock your full potential with our guide to developing a growth mindset. Discover how to embrace challenges, boost learning, and achieve success.

Deviled Eggs Guide: How to Make the Best Deviled Eggs at Home
If you’re looking for a timeless crowd-pleaser, deviled eggs are a must-have for brunches, holidays, and gatherings. But what are deviled eggs exactly? A deviled egg is a hard-boiled egg that’s been halved, with the yolk scooped out, mixed with flavorful ingredients like mayonnaise, mustard, and spices, and then piped or spooned back into the egg white. The result is a creamy, tangy, and visually appealing appetizer that’s as versatile as it is delicious. With this guide, you’ll learn how to make deviled eggs at home, step by step, and explore three of the best deviled egg recipes that are perfect for any occasion. How to Make Deviled Eggs Making your own deviled eggs at home is simple, and the results are always impressive. Here’s what you need and how to do it: Tools You’ll Need Saucepan or pot for boiling eggs Bowl of ice water Knife Spoon or piping bag for filling Mixing bowl Fork or whisk Ingredients for the Base 6 large eggs 3 tablespoons mayonnaise 1 teaspoon Dijon mustard Salt and pepper to taste Step-by-Step Instructions Boil the Eggs: Place eggs in a saucepan and cover with cold water. Bring to a boil over medium heat. Once boiling, cover, remove from heat, and let sit for 10–12 minutes. Cool the Eggs: Transfer eggs to a bowl of ice water to stop cooking and make peeling easier. Let them sit for 5 minutes. Peel and Halve: Gently peel the eggs and slice them in half lengthwise. Carefully remove the yolks and place them in a mixing bowl. Make the Filling: Mash the yolks with mayonnaise, Dijon mustard, salt, and pepper until smooth and creamy. You can adjust ingredients to taste or add extras like paprika or a splash of vinegar. Fill the Egg Whites: Spoon or pipe the yolk mixture back into the egg white halves. Garnish: Sprinkle with paprika, chives, bacon bits, or herbs for added flavor and presentation. Serve Immediately: Or refrigerate for up to a day before serving. This method creates a versatile base for all best deviled eggs recipes, letting you customize flavors and toppings easily. 1. Classic Deviled Eggs This best deviled eggs recipe sticks to the timeless flavors everyone loves. Ingredients: 6 large eggs 3 tablespoons mayonnaise 1 teaspoon Dijon mustard Salt and pepper to taste Paprika for garnish Instructions: Follow the base how to make deviled eggs steps above. Fill the egg whites with the creamy yolk mixture. Sprinkle paprika on top for a classic finish. Serve immediately or chill for up to a day. 2. Bacon & Chive Deviled Eggs Add a savory twist to your deviled eggs recipe with crispy bacon and fresh chives. Ingredients: 6 large eggs 3 tablespoons mayonnaise 1 teaspoon Dijon mustard Salt and pepper to taste 2 slices cooked bacon, crumbled 1 tablespoon chopped chives Instructions: Prepare the base deviled eggs as above. Fold crumbled bacon and chopped chives into the yolk mixture before filling. Pipe or spoon into egg whites. Garnish with extra bacon and chives. Serve immediately for a rich, savory flavor. 3. Avocado Deviled Eggs For a fresh, creamy, and slightly tangy twist, try this healthy deviled eggs recipe with avocado. Ingredients: 6 large eggs 1 ripe avocado 1 teaspoon lime juice 1 teaspoon Dijon mustard Salt and pepper to taste Chili flakes or paprika for garnish Instructions: Prepare the base deviled eggs as usual, removing yolks. Mash the yolks with avocado, lime juice, mustard, salt, and pepper until smooth. Spoon or pipe the mixture back into the egg whites. Sprinkle with chili flakes or paprika for color and a mild kick. Serve immediately for a fresh and creamy flavor twist. Final Thoughts on Deviled Eggs Whether you’re serving a classic crowd-pleaser, a savory bacon twist, or a fresh avocado variation, deviled eggs are a versatile and timeless appetizer. Making them at home allows you to control flavors, experiment with ingredients, and create visually appealing dishes that impress guests at brunches, holidays, or casual gatherings. With this guide, you now know what deviled eggs are, how to make deviled eggs step by step, and three of the best deviled eggs recipes to try. Grab your eggs, get creative with toppings, and enjoy a delicious snack that’s as fun to make as it is to eat.

The Ultimate Guide to Making Açaí Bowls at Home
If you’ve been scrolling through healthy food trends, you’ve probably seen açaí bowls everywhere—and for good reason. An açaí bowl recipe is essentially a smoothie made from frozen açaí berries, blended to a thick, creamy consistency, then topped with a variety of fruits, granola, nuts, seeds, and sometimes a drizzle of honey. So, what is an açaí bowl exactly? It’s a refreshing, nutrient-packed breakfast or snack that combines antioxidants, fiber, and healthy fats into a visually stunning dish. The base comes from açaí, a small, dark purple berry native to the Amazon rainforest, prized for its rich flavor and health benefits. Whether you’re looking for a quick breakfast, a post-workout boost, or a photogenic snack, knowing how to make açaí bowls at home lets you customize toppings and flavors to suit your taste. How to Make Açaí Bowls at Home Making your own healthy açaí bowl recipes at home is easier than it looks. Here’s everything you’ll need and a simple method that works for any flavor: Tools You’ll Need Blender (high-powered preferred) Spoon Bowl Knife and cutting board Measuring cups Ingredients for the Base 100–150g frozen açaí puree (unsweetened) 1 banana (fresh or frozen for extra creaminess) 1/4 cup frozen berries (strawberries, blueberries, or raspberries) 1/4 cup plant-based milk or juice (almond, oat, coconut, or apple juice) Step-by-Step Instructions Blend the Base: Add frozen açaí, banana, berries, and liquid to the blender. Blend until smooth and thick. You want it to be scoopable, not runny. Prepare Toppings: Slice fresh fruits, measure granola, and gather seeds, nuts, or other extras like shredded coconut or cacao nibs. Assemble the Bowl: Pour the blended açaí mixture into a bowl. Smooth the top with the back of a spoon. Add Toppings: Arrange fruits, granola, and other toppings in a visually appealing way. Be creative—presentation is part of the fun! Serve Immediately: Enjoy your homemade açaí bowl fresh for the best texture and flavor. This method is versatile: you can swap fruits, add superfoods like chia seeds, or drizzle nut butter. It’s the perfect base for any açaí smoothie recipe or variation you want to try. 1. Classic Açaí Bowl Lorem ipsum dolor sit amet, consectetur adipiscing elit. Ut elit tellus, This açaí bowl recipe sticks to the basics while packing in antioxidants and flavor. Ingredients: 100g frozen açaí puree 1 banana 1/4 cup frozen blueberries 1/4 cup almond milk Toppings: Granola Fresh banana slices Blueberries Drizzle of honey or agave Instructions: Blend açaí, banana, blueberries, and almond milk until thick and creamy. Pour into a bowl. Add granola, banana slices, blueberries, and honey drizzle on top. Serve immediately and enjoy a classic, nutritious start to your day. luctus nec ullamcorper mattis, pulvinar dapibus leo. 2. Strawberry Açaí Bowl Sweet, vibrant, and perfect for summer mornings, this healthy açaí bowl recipe celebrates strawberries. Ingredients: 100g frozen açaí puree 1 banana 1/2 cup frozen strawberries 1/4 cup coconut water Toppings: Fresh strawberry slices Granola Chia seeds Shredded coconut Instructions: Blend açaí, banana, frozen strawberries, and coconut water until smooth. Pour into a bowl and smooth the top. Add strawberry slices, granola, chia seeds, and shredded coconut. Enjoy a fruity, Instagram-worthy breakfast. 3. Tropical Açaí Bowl Bring a taste of the tropics to your morning with this refreshing açaí smoothie recipe packed with mango and pineapple. Ingredients: 100g frozen açaí puree 1 banana 1/4 cup frozen mango 1/4 cup frozen pineapple 1/4 cup coconut milk Toppings: Fresh mango chunks Pineapple pieces Toasted coconut flakes Granola Instructions: Blend açaí, banana, frozen mango, frozen pineapple, and coconut milk until thick and creamy. Pour into a bowl and smooth the surface. Arrange mango chunks, pineapple pieces, toasted coconut, and granola on top. Serve immediately for a tropical, energizing start to your day. Final Thoughts on Making an Açaí Bowl Whether you’re craving a classic, a fruity strawberry twist, or a tropical escape, these açaí bowl recipes make it easy to enjoy a healthy, flavorful breakfast or snack anytime. Making healthy açaí bowl recipes at home lets you customize toppings, experiment with flavors, and control sweetness while packing in nutrients from fresh fruits, granola, and superfoods. With this guide, you now know what an açaí bowl is, how to make them step by step, and three standout recipes to try. From vibrant strawberries to tropical mango and pineapple, there’s a bowl for every taste and mood. So grab your blender, get creative, and bring a little Amazonian magic to your kitchen!

90s Nails Designs to Inspire Your Next Mani
If you’re looking to channel some retro vibes, 21 90s nails designs are the perfect place to start. The ’90s were all about playful creativity, bold colors, and iconic patterns that still inspire nail trends today. Here are the first five designs that defined the decade: 1. Neon Tips Bright neon colors were a hallmark of ’90s nails. Think electric pinks, lime greens, and sunny yellows on short or medium nails. Neon tips paired with a clear or nude base gave a playful pop without being overwhelming. 2. French Tips with a Twist While classic French tips existed before, the ’90s introduced colored tips—hot pink, baby blue, or even metallic shades—turning the timeless style into a fun statement. 3. Checkerboard Patterns Checkerboard nails were edgy yet stylish. Black-and-white squares or alternating neon colors made nails feel graphic and bold, perfect for fans of alternative ’90s fashion. 4. Glitter Accents Nothing screamed ’90s more than a touch of glitter. Often applied to the ring finger or as a gradient over the nail, chunky or fine glitter added instant drama and sparkle to any look. 5. Acid Wash or Marble Effect Inspired by denim and tie-dye trends, acid-wash or marble nails used swirling patterns in soft pastels or neon shades. This design was artistic, playful, and distinctly ’90s. 6. Holographic Nails Holographic finishes were all the rage in the ’90s. Nails that shimmered and reflected rainbow colors captured that futuristic, club-ready aesthetic. Perfect for short or long nails with a glossy topcoat to make them pop. 7. Animal Prints Leopard spots, zebra stripes, and snake patterns made a statement in the ’90s. Often done in bold colors or metallic shades, these designs were all about expressing personality through nails. 8. Matte Pastels Soft pastel nails in matte finish became a subtle yet trendy choice. Colors like baby pink, mint green, and lavender gave a chic and understated nod to ’90s minimalism. 9. Stripes and Lines Horizontal, vertical, or diagonal stripes in contrasting colors added a playful geometric vibe. Often combined with bright colors or glitter accents, stripes were versatile and fun. 10. Two-Tone Color Blocking Mixing two contrasting colors on a single nail or alternating nails became an iconic ’90s look. Think black and white, neon combinations, or pastel contrasts to create a bold, eye-catching effect. 11. Jelly Nails Clear, translucent nails known as “jelly nails” were a playful ’90s trend. Often in soft pinks, purples, or oranges, these nails gave a fun, see-through effect that made layers of glitter or tiny designs pop. 12. Smiley Faces and Cute Doodles Cartoonish smiley faces, stars, and tiny hearts were popular nail art motifs. These whimsical designs captured the playful, carefree spirit of the decade. 13. Metallic Tips Chrome and metallic finishes on tips or full nails added instant ’90s glam. Gold, silver, and holographic metals were especially trendy for parties and club nights. 14. Colorful French Manicures A modern twist on the classic French, this involved painting the tips in multiple bright shades across nails—rainbow patterns or alternating neons kept it fun and youthful. 15. Glitter French Tips Glitter combined with the classic French tip brought sparkle to the iconic style. Often done with gold, silver, or iridescent glitter, it was a perfect blend of elegance and playfulness. 16. Neon Ombre Gradient neon nails blended two or more bright colors for that electric ’90s feel. Pink-to-orange or green-to-yellow transitions were especially popular. 17. Glitter Tips Similar to French tips but with sparkle, glitter tips added instant glam. Silver, gold, or multi-colored glitter on short or medium nails gave that party-ready vibe. 18. Checkerboard Accents Checkerboard patterns weren’t just full nails—they could also appear as small accent nails. Black-and-white squares or neon colors gave a playful, edgy touch. 19. Tiny Gems and Studs Adding tiny rhinestones or studs was a subtle way to glam up nails. Often applied on the ring finger or as scattered accents, it added dimension without going overboard. 20. Pop Art Nails Inspired by comic books and bold graphics, pop art nails featured dots, bold lines, and cartoonish shapes. Colors were bright and patterns eye-catching—a perfect 90s statement. 21. Clear Nails with Embedded Designs Clear nails with flowers, glitter, or decals embedded inside the nail were a creative 90s staple. These designs showed off the nail itself while adding a playful decorative element. Final Thoughts on 90’s Nail Designs Looking back at the ’90s, nails were all about fun, bold expression, and experimenting with color and patterns. From neon tips and checkerboards to jelly nails and pop art accents, these 90s nails designs capture the playful spirit of the decade. Whether you’re recreating a nostalgic look or putting a modern twist on a classic design, these nails prove that the ’90s aesthetic is timeless. So grab your favorite polish, get creative with patterns, and let your manicure be a little throwback to one of the most iconic decades in fashion and style.
What to Do in Copenhagen Guide with 15 Must-See Experiences
If you’re planning a trip to Copenhagen, you’re in for a city full of charm, history, and vibrant culture. From picturesque canals and colorful harbor streets to historic palaces and modern culinary delights, Copenhagen offers an endless list of experiences. This guide covers what to do in Copenhagen in an orderly route, so you can flow naturally from one landmark to the next without missing any must-see spots. Whether it’s your first visit or a return trip, you’ll find a mix of iconic sights, hidden gems, and local favorites to make your stay unforgettable. 1. Explore Nyhavn Harbor One of the first must-do activities when planning what to do in Copenhagen is visiting Nyhavn Harbor, the iconic waterfront lined with colorful 17th-century buildings, cafes, and historic ships. Duration: 1–2 hours Highlights: Picturesque canal views, historic wooden ships, outdoor cafés, street performances Price: Free to walk around; dining or canal tours cost €15–€40 Tips: Arrive in the morning for fewer crowds, or stay for a sunset canal tour for a magical view. Nyhavn is a perfect starting point for your Copenhagen adventure, giving a sense of the city’s charm and history. 2. Take a Canal Tour from Nyhavn One of the first must-do activities when planning what to do in Copenhagen is visiting Nyhavn Harbor, the iconic waterfront lined with colorful 17th-century buildings, cafes, and historic ships. Duration: 1–2 hours Highlights: Picturesque canal views, historic wooden ships, outdoor cafés, street performances Price: Free to walk around; dining or canal tours cost €15–€40 Tips: Arrive in the morning for fewer crowds, or stay for a sunset canal tour for a magical view. Nyhavn is a perfect starting point for your Copenhagen adventure, giving a sense of the city’s charm and history. 3. Visit The Little Mermaid Statue A short trip from the canals is the iconic Little Mermaid statue, one of the top things to do in Copenhagen. Inspired by Hans Christian Andersen’s fairy tale, it’s a must-see for first-time visitors. Duration: 30–45 minutes Highlights: Iconic statue, waterfront views, photo opportunities Price: Free Tips: Go early in the morning to avoid crowds; combine with a walk along Langelinie promenade for scenic views. Seeing the Little Mermaid provides a classic Copenhagen photo moment and a gentle stroll along the harbor. 4. Explore Kastellet Fortress Next on your list of what to do in Copenhagen is Kastellet, a star-shaped historic fortress just a short walk from the Little Mermaid. It’s a serene escape with rich history and beautiful grounds. Duration: 1 hour Highlights: Historic ramparts, windmill, peaceful walking paths, military history Price: Free Tips: Walk the perimeter for the best views; bring a picnic to enjoy in the gardens. Kastellet combines history and tranquility, making it a natural next stop after visiting the Little Mermaid. 5. Wander Through Amalienborg Palace After Kastellet, a key stop on your list of what to do in Copenhagen is Amalienborg Palace, the home of the Danish royal family. Visitors can watch the ceremonial changing of the guards and explore the elegant square. Duration: 1–1.5 hours Highlights: Changing of the Guard, royal architecture, Amalienborg Museum Price: Palace Square is free; Amalienborg Museum around €10–€12 Tips: Check the guard schedule; combine with a stroll toward Frederik’s Church for beautiful architecture. Amalienborg offers a mix of history, royalty, and central Copenhagen charm. 6. Visit Frederik’s Church (The Marble Church) Just a short walk from Amalienborg, Frederik’s Church, also known as the Marble Church, is another must-see on your things to do in Copenhagen list. Its impressive dome and ornate interiors are a photographer’s dream. Duration: 30–45 minutes Highlights: Stunning dome, Baroque architecture, guided interior tours Price: Free to enter Tips: Go inside for the full experience; climb the dome for panoramic city views if open. This stop pairs perfectly with Amalienborg for a royal and architectural experience in one walk. 7. Stroll Through Nyboder Historic District Next on your list of what to do in Copenhagen is Nyboder, the historic row houses built for the Danish navy. The charming yellow buildings and narrow streets offer a glimpse into Copenhagen’s past. Duration: 30–45 minutes Highlights: Colorful historic houses, quiet streets, photo opportunities Price: Free Tips: Combine with a walk toward the waterfront or Amalienborg for a scenic route; bring a camera to capture the iconic yellow façades. Nyboder provides a peaceful, historic break in the city and is perfect for a leisurely stroll. 8. Explore The Round Tower (Rundetårn) For one of the most iconic stops on your things to do in Copenhagen, head to The Round Tower. This 17th-century observatory offers panoramic city views and a spiraling walkway that’s fun for all ages. Duration: 45 minutes–1 hour Highlights: Observatory deck, historic architecture, art exhibitions inside Price: Around €5–€7 per person Tips: Walk the spiral ramp for unique photo angles; visit the small gallery inside for rotating exhibits. The Round Tower is a blend of history, art, and breathtaking views, making it a must-see in the city center. 9. Discover Strøget Shopping Street A short walk from the Round Tower, Strøget is one of Europe’s longest pedestrian shopping streets and a must-see on your what to do in Copenhagen list. From high-end brands to local boutiques and cozy cafés, it’s perfect for exploring and people-watching. Duration: 1–2 hours Highlights: Shops, street performers, cafés, historic buildings Price: Free to stroll; shopping costs vary Tips: Keep an eye out for unique Danish design stores; stop for a coffee at one of the outdoor cafés. Strøget connects many central Copenhagen attractions, making it a convenient and lively stop. 10. Visit Copenhagen City Hall and Square Just off Strøget is Copenhagen City Hall, located in the bustling City Hall Square, another key stop on your things to do in Copenhagen list. Admire the historic architecture, take photos, or join a guided tour inside the hall. Duration: 30–60 minutes Highlights: Historic architecture, Jens Olsen’s World Clock, central square events Price: Free to explore the square; guided tours of City Hall about €8–€10 Tips: Check if there’s

Everything to Know for a Trip to Prague
If you’re planning a trip to Prague, the best time to visit Prague is during spring (April to June) or early fall (September to October). During these months, the weather is mild, tourist crowds are smaller, and the city’s historic streets, gardens, and riverside views are at their most charming. Why: Spring offers blooming parks and outdoor cafés, while early fall provides crisp air, vibrant foliage, and plenty of cultural events—perfect for exploring without the peak summer rush. Planning your visit around these months ensures you experience Prague comfortably, whether you’re strolling across Charles Bridge or enjoying a riverside café. Where is Prague For anyone planning a trip to Prague, it helps to know that the city is the capital of the Czech Republic, located in Central Europe. Nestled along the Vltava River, Prague is easily accessible from major European cities and serves as a hub for history, culture, and architecture. Whether you’re flying in or taking a train from nearby countries, knowing where Prague is will help you plan your journey efficiently. Things to See in Prague On a trip to Prague, there’s no shortage of stunning sights. From the iconic Prague Castle and Charles Bridge to charming squares and historic churches, the city is packed with landmarks that capture its rich history and architectural beauty. Whether wandering the cobblestone streets of Old Town or admiring the art and colors of the John Lennon Wall, Prague offers endless inspiration for travelers. For a full experience, explore the many things to see in Prague while planning your days around the city’s neighborhoods. Best Hotels in Prague For a trip to Prague, choosing the right place to stay can make all the difference. Whether you want luxury, history, or a charming boutique vibe, these are three of the best hotels in Prague: Aria Hotel Prague – Nestled near the Lesser Town, this music-themed luxury hotel offers elegant rooms, rooftop terraces, and easy access to Prague Castle. Perfect for travelers who want comfort and culture in one stay. Hotel Paris Prague – A historic, Art Nouveau gem in the city center, just steps from Old Town Square. Its stunning architecture and classic interiors make it ideal for those seeking a mix of history and luxury. NYX Hotel Prague by Leonardo Hotels – For a more modern and artistic stay, this boutique hotel in Prague 1 combines edgy design, central location, and vibrant energy—great for city explorers and creatives alike. Choosing any of these hotels ensures you’re in the heart of the city, with easy access to top attractions, restaurants, and nightlife while enjoying a comfortable base for your trip to Prague. What Time is It in Prague If you’re planning a trip to Prague, it’s helpful to know the local time. Prague operates on Central European Time (CET), which is UTC +1. During daylight saving time (late March to late October), clocks move forward one hour to Central European Summer Time (CEST, UTC +2). Knowing the time difference can help you plan flights, tours, and sightseeing efficiently, ensuring you make the most of your trip to Prague. Conclusion: Your Trip to Prague A trip to Prague offers a perfect mix of history, culture, and modern charm. From exploring iconic landmarks and strolling cobblestone streets to sampling Czech cuisine and relaxing in beautiful parks, the city is full of memorable experiences. By planning your visit around the best time to visit Prague, knowing where Prague is, and choosing accommodations at some of the best hotels in Prague, you can make the most of your stay. Don’t forget to explore the many things to see in Prague and keep track of what time it is in Prague for smooth scheduling. Prague is a city that stays with you long after you leave, offering both iconic sights and hidden gems that make every trip to Prague unforgettable.
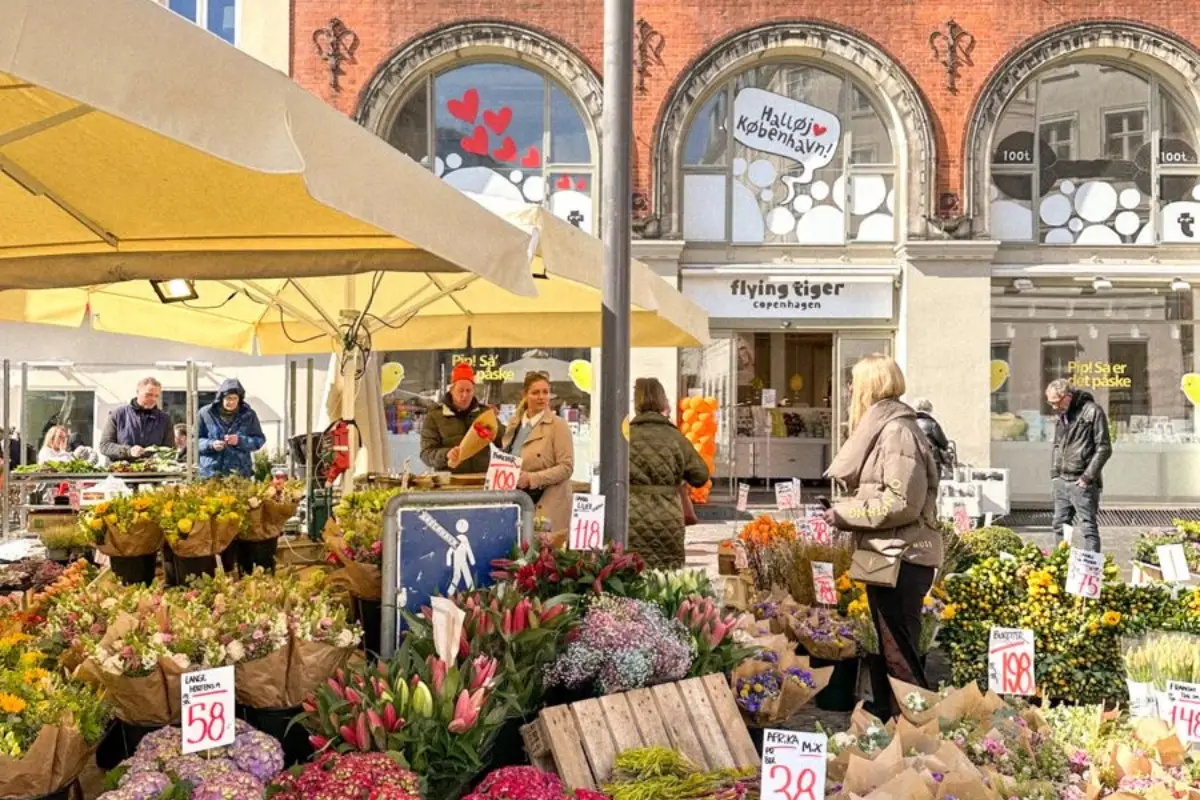
How to Plan Your Trip to Copenhagen Denmark
If you’ve ever dreamed of visiting Copenhagen Denmark, you’ll be happy to know it’s one of Europe’s most charming, stylish, and traveler-friendly destinations. Between historic castles, cobblestone streets, and a buzzing food scene, it’s the kind of city that blends old-world beauty with modern energy. But before you dive into the best coffee shops or the famous bike lanes, let’s start with the practical steps for planning your trip. Where Is Copenhagen? Copenhagen is the capital of Denmark, located in Northern Europe on the eastern coast of the island of Zealand, just across the Øresund Strait from Sweden. On a map, you’ll see it nestled between Norway, Sweden, and Germany, making it easy to add to a broader Scandinavian or European trip. It’s part of Scandinavia, known for its design-forward cities, friendly locals, and high quality of life. Being so central, Copenhagen is also a hub for trains and flights connecting to the rest of Europe. Best Time to Visit Copenhagen The best time to visit Copenhagen is from May to September, when the weather is mild, the days are long, and the city feels alive with outdoor cafés, bike rides, and festivals. July and August are peak summer months—perfect for warm evenings by the canals but also the busiest for tourists. If you prefer fewer crowds and cozy vibes, try December, when Copenhagen transforms into a winter wonderland with its famous Christmas markets and festive lights. Entry Requirements and Getting to Copenhagen Before you plan your trip, check whether you’ll need a visa for Denmark. Travelers from the EU, US, Canada, UK, Australia, and several other countries can enter Denmark without a visa for up to 90 days within the Schengen Zone. If you’re outside those regions, you’ll likely need to apply for a Schengen visa in advance. You’ll likely arrive through Copenhagen Airport (CPH), the largest airport in Denmark and just 15–20 minutes from the city center by metro or train. It’s one of the most efficient airports in Europe, with direct connections to most major cities. Tip: Grab a Copenhagen Card at the airport or online before arrival. It covers unlimited public transport and entry to many attractions—perfect if you want a stress-free start to your trip. Where to Stay in Copenhagen: Hotels and Airbnb Finding the right place to stay can make or break your trip, and Copenhagen Denmark has plenty of options that fit every style and budget. Hotel d’Angleterre – The city’s most iconic luxury hotel, right on Kongens Nytorv Square. Expect historic elegance, a world-class spa, and walking distance to Nyhavn. About 20 minutes from the airport by metro. Axel Guldsmeden – A boutique eco-hotel near Tivoli Gardens with Balinese-inspired interiors and organic breakfast. Around 25 minutes from the airport. 25hours Hotel Indre By – Trendy and playful, set in a former university building. Perfect if you want a central base with design-forward rooms. 20 minutes from the airport. Airbnb Copenhagen – For a local experience, look for Airbnbs in Vesterbro (hip cafés and nightlife), Nørrebro (multicultural food and creative energy), or Østerbro (quiet, family-friendly). Most are 20–30 minutes from the airport by metro or train. Whether you go for an Airbnb in Copenhagen or a hotel stay, the city’s compact size means you’re never too far from the main sights. Copenhagen food and best restaurants But let’s be real—part of Copenhagen’s charm is the food. The city is a dream for anyone who loves to eat well, whether that means grabbing a flaky pastry from a local bakery or sitting down at one of the world’s most celebrated fine-dining spots. Copenhagen has a food culture that balances creativity with comfort, where traditional Nordic flavors meet bold innovation. For something casual and cozy, Torvehallerne Market is where you’ll want to start. It’s packed with stalls serving everything from artisanal chocolates to fresh seafood, making it easy to sample a little bit of everything. Street food fans will also love Reffen, an outdoor food market that brings together international flavors in a lively, waterside setting. Of course, Copenhagen also has serious culinary clout. Restaurants like Noma and Geranium are global icons, known for redefining what dining can be with inventive tasting menus and locally sourced ingredients. But you don’t have to splurge to eat well—places like Grød, which has made porridge a modern comfort food, or local smørrebrød cafés serving traditional open-faced sandwiches, show that even everyday meals in Copenhagen feel special. It’s the kind of city where food becomes part of the travel experience—something you remember as clearly as the sights you see. Whether you’re wandering with a pastry in hand or sitting down to a Michelin-starred dinner, Copenhagen makes sure the flavors linger long after you’ve left. Conclusion Copenhagen is one of those cities that leaves an imprint on you long after you leave. It’s not just about the postcard-perfect canals, colorful houses, and bicycles everywhere — it’s about the feeling of being in a place where design, culture, and everyday life blend seamlessly. From exploring historic castles to biking like a local, indulging in New Nordic cuisine, and diving into the city’s vibrant shopping scene, there’s something here for every traveler. The best part? Copenhagen balances modern innovation with timeless charm, making it as exciting on your first visit as it is on your fifth. If you’re planning a trip to Scandinavia, Copenhagen deserves a top spot on your list. It’s not just a city to visit — it’s a city to experience.

Dread Styles 101: Everything You Need to Know About Styling
If you’ve ever searched for dread styles, you know how versatile and expressive they can be. From bold statement looks to subtle everyday options, there’s a type of dreadlock to fit every vibe. Understanding the different kinds helps you decide which style fits your personality, maintenance preferences, and lifestyle. Traditional Dreads These are the classic, time-honored dreads formed by sectioning hair and allowing it to lock naturally over time. They offer a natural, organic look and are often easier to maintain once established. Sisterlocks Sisterlocks are micro-sized, uniform locks that create a sleek, refined appearance. They require professional installation and regular maintenance, but they give a polished and versatile foundation for styling. Freeform Dreads Freeform dreads embrace natural hair movement with minimal manipulation. They’re formed by simply letting hair lock over time, resulting in unique textures and shapes. This style celebrates individuality and low-maintenance beauty. Faux Locs Faux locs are a protective, temporary option created by wrapping extensions around your natural hair. They mimic the look of traditional dreads without the long-term commitment, perfect for experimenting with length, color, or style. Everyday Dread Styles Once you’ve chosen your type of dreadlocks, it’s time to explore dread styles you can rock day to day. These looks are effortless, versatile, and perfect for work, errands, or casual hangouts. Half-Up, Half-Down This style keeps your dreads out of your face while still showing off their length and texture. Simply gather the top section of your hair and secure it with a hair tie or claw clip. Optional: add beads or cuffs for subtle flair. Ponytail or Bun For a quick, polished look, pull your dreads into a low or high ponytail or bun. This style is easy, protective, and perfect for hot days or busy schedules. A wrap of a silk scarf around the base adds extra style points and protects your hairline. Side-Swept Styles Sweep your dreads to one side for a relaxed, asymmetrical look. Use a little styling gel or mousse to keep flyaways in check, and optionally accessorize with pins, beads, or a decorative clip. This style works well for both short and long dreads and adds instant dimension to your look. Protective & Low-Maintenance Styles If you’re looking to minimize daily styling while keeping your dreads healthy, protective and low-maintenance dread styles are your best friends. These looks shield your hair from damage, reduce frizz, and keep your parts neat. Twists & Braids with Dreads Incorporating twists or braids into your dreads adds texture and keeps hair controlled. You can do simple two-strand twists or braid small sections for a playful, versatile look. This style also doubles as a protective option for longer wear. Updos for Protection High buns, chignons, or tucked-up styles protect the ends of your dreads while giving you a polished, chic vibe. Secure with silk or satin ties to prevent breakage along the hairline. Wraps & Turbans Wrapping your dreads in scarves, turbans, or headwraps is a stylish way to protect your hair from environmental stress while making a fashion statement. Opt for silk or satin fabrics to reduce friction and maintain moisture. Formal & Statement Styles When you want your dreads to shine at events or make a bold statement, these dread styles are perfect for turning heads. They combine elegance, creativity, and personality in ways that elevate any look. Elegant Updos Sophisticated updos, like twisted buns or braided crowns, instantly transform your dreads for weddings, parties, or professional events. Add decorative pins or cuffs for an extra touch of glamour. Dreadlock Mohawk For a daring, edgy look, the dreadlock mohawk shifts attention to the center of your head while keeping sides sleek or braided. This style is bold, modern, and perfect for those who love to experiment. Layered and Accessorized Looks Layer your dreads and mix in beads, cuffs, or wraps to create visual interest and dimension. These statement styles allow you to express your personality while showcasing the texture and length of your hair. How to Care for Styled Dreads Keeping your dreads healthy and looking fresh is just as important as choosing the right dread styles. Proper care ensures longevity, prevents buildup, and maintains neat, defined parts. Washing & Moisturizing Use a residue-free shampoo to cleanse your scalp without leaving product buildup. Follow up with a lightweight moisturizer or natural oil, like jojoba or argan, to keep your dreads hydrated without weighing them down. Preventing Buildup Avoid heavy creams or waxes that can accumulate over time. Instead, opt for light styling products and clarify your hair periodically to maintain cleanliness and prevent odor or scalp irritation. Maintaining Neat Parts Regularly retwist or palm-roll your dreads to keep the sections defined. Depending on your hair type, retwisting every 4–6 weeks helps maintain a polished look while minimizing breakage and thinning. How to Care for Styled Dreads Maintaining your dread styles is just as important as creating them. Proper care keeps your hair healthy, neat, and long-lasting. Here’s a step-by-step guide to caring for styled dreads: Step 1: Washing & Moisturizing Wash your dreads every 1–2 weeks using a residue-free shampoo like Dr. Bronner’s Pure-Castile Soap or Knotty Boy Dreadlock Shampoo. After washing, apply a lightweight oil or leave-in moisturizer, such as Jamaican Black Castor Oil or Cantu Shea Butter Leave-In, to keep dreads hydrated. Step 2: Preventing Buildup Avoid heavy creams or waxes that can accumulate in your dreads. Use a clarifying rinse occasionally, like apple cider vinegar diluted with water, to remove residue and maintain scalp health. Step 3: Maintaining Neat Parts Retwist your roots every 4–6 weeks to keep your dreads tidy. Products like Murray’s Gel or Dreadlock Tightening Gel work well for control. Use a crochet hook or latch hook for minor frizz touch-ups between retwists. Step 4: Daily Care Sleep with a silk or satin scarf or pillowcase to reduce friction and prevent breakage. Lightly palm-roll or separate dreads to maintain shape and prevent them from merging. Following these steps keeps your styled dreads looking fresh, healthy,

The Ultimate Guide to Things to Do in Prague, Czech Republic
If you’re planning a trip to the Czech Republic, one of the most exciting destinations on your list should be Prague. Known as the “City of a Hundred Spires,” Prague is rich in history, stunning architecture, vibrant culture, and unforgettable experiences. From the medieval streets of Old Town to the lush landscapes just outside the city, the things to do in Prague are diverse, immersive, and perfect for every type of traveler. Whether you’re a history buff, foodie, adventure seeker, or culture lover, this guide will walk you through a well-organized itinerary, helping you explore the city in a logical flow—so you can make the most of your time while discovering Prague’s iconic landmarks, hidden gems, and local favorites. Get ready to stroll across the Charles Bridge, capture photos at the John Lennon Wall, sip Czech beer in a historic pub, and venture on day trips to scenic parks and medieval towns—all while experiencing the best things to do in Prague, Czech Republic. 1. Visit Bohemian and Saxon Switzerland National Parks If you’re exploring things to do in Prague, a nature escape is a must. Located about 2.5 hours from Prague, the Bohemian and Saxon Switzerland National Parks offer breathtaking sandstone formations, dramatic cliffs, and serene hiking trails. Duration: Full-day trip (8–10 hours) Highlights: Pravčická brána (the largest natural sandstone arch in Europe), hiking trails, Elbe River views, rock towers Price: Guided tours from Prague start around €60–€80 per person, including transportation Tips: Wear sturdy shoes and bring water; tours often include lunch or allow stops in quaint local villages. This is a great way to start your Czech adventure with a mix of adventure and spectacular scenery before heading back to the city. 2. Eat Your Way Through Prague on a Food Tour After returning from the national parks, immerse yourself in Prague’s culinary scene. A Prague food tour is one of the best ways to experience authentic Czech cuisine while walking through historic streets. Duration: 3–4 hours Highlights: Traditional Czech dishes like svíčková, goulash, trdelník (chimney cake), craft beer tastings Price: Around €50–€70 per person for a guided food tour Tips: Wear comfortable shoes for walking, and pace yourself—Czech food portions are hearty. Tours often include hidden gems and local markets. This activity gives you a delicious and cultural introduction to the heart of Prague before exploring more historic and iconic sights. 3. Learn About Prague’s Dark History on a Nighttime Ghost Tour Back in the city, dive into Prague’s mysterious past with a nighttime ghost tour. This spooky walking tour winds through cobbled streets, haunted alleys, and gothic squares, offering a chilling yet fascinating perspective on the city’s history. Duration: 2–2.5 hours Highlights: Haunted Prague stories, old town alleys, legends of the Astronomical Clock, mysterious statues and landmarks Price: Around €20–€30 per person Tips: Bring a jacket for evening chills and a flashlight for better visibility; tours are guided in English and often combine entertainment with history. This activity is perfect for history buffs and thrill-seekers, giving your Prague itinerary a darkly fascinating twist. 4. Cruise Around the City on a Bicycle After a spooky evening or early morning, see Prague from a new perspective with a bicycle tour. Cycling lets you cover more ground while enjoying the city’s architecture, bridges, and riverside paths. Duration: 3–4 hours Highlights: Charles Bridge, Old Town Square, Prague Castle surroundings, riverside promenades Price: Guided tours from €25–€40 per person; bike rentals are cheaper if you explore solo Tips: Wear comfortable shoes, bring water, and consider a helmet for safety. Early mornings are ideal to avoid crowds on popular routes. A bike tour offers both sightseeing and light exercise, keeping your Prague exploration fun and active. 5. Day Trip to the Medieval Town of Český Krumlov A few hours south of Prague lies the UNESCO-listed town of Český Krumlov, perfect for a medieval escape. Cobblestone streets, colorful buildings, and a stunning castle make it one of the Czech Republic’s most picturesque towns. Duration: Full-day trip (9–10 hours, including travel) Highlights: Český Krumlov Castle, Old Town Square, river views, historic architecture Price: Guided tours from Prague start around €60–€90 per person; train or bus tickets are cheaper if traveling independently Tips: Wear comfortable shoes for walking; consider a guided tour to learn the rich history and hidden gems. A day trip to Český Krumlov is ideal for culture lovers and photographers seeking medieval charm just a short journey from Prague. 6. Dive into Prague’s Historic Beer Culture No trip to Prague is complete without exploring its historic beer culture. From centuries-old pubs to modern microbreweries, sampling local brews is a fun and authentic Czech experience. Duration: 2–4 hours Highlights: Traditional Czech lagers, historic pubs like U Fleků, brewery tours, tasting sessions Price: Beer tastings and tours range from €20–€35 per person Tips: Pace yourself—Czech beers are strong! Book a guided beer tour for insider knowledge and hidden gems. Exploring Prague’s beer culture gives a taste of the city’s social life, history, and traditions, adding flavor to your itinerary. 7. Enjoy Dinner on the Vltava River Jazz Cruise One of the most relaxing things to do in Prague is a dinner cruise on the Vltava River. Glide past illuminated bridges and historic architecture while enjoying live jazz and a gourmet meal. Duration: 2–3 hours Highlights: Panoramic views of Prague Castle, Charles Bridge at night, live jazz music, three-course dinner Price: Around €55–€80 per person Tips: Book in advance to secure window seating; dress smart-casual for a comfortable and elegant experience. This activity combines sightseeing and fine dining, offering a unique perspective on Prague’s charm after a day of exploration. 8. Experience a Medieval Dinner Performance For a truly immersive experience, add a medieval dinner performance to your list of things to do in Prague. Step back in time with authentic Czech cuisine, historical entertainment, and period décor. Duration: 2–3 hours Highlights: Traditional medieval feast, music and theatrical performances, candlelit atmosphere Price: Around €45–€65 per person Tips: Arrive early to choose your seating; dietary